Как установить umod rust


| 4,475 | просмотров на YouTube™ |
| 6 | уникальных посетителей |
| 0 | добавили в избранное |
— open steam cmd type:
login anonymous or you can use your own steam details
(If you want to install to a different location then create the folder
type in force_install dir then put your directory in » «)
— type app_update 258550 validate
steamcmd.exe +login anonymous +app_undate 258550 validate +quit
— open up rust type connect localhost:28015 (or whatever you set it to)
oxide.reload * to reload it
give yourself admin now, get your steam ID, using steamid on google
https://steamid.io/
ownerid steam number
__________________________________________________________________
Consider Supporting my Channel
If you found this video valuable, like it
If you know someone who needs to see it, share it.
Leave a comment below with what you think
Drop me a sub if you want to see more»
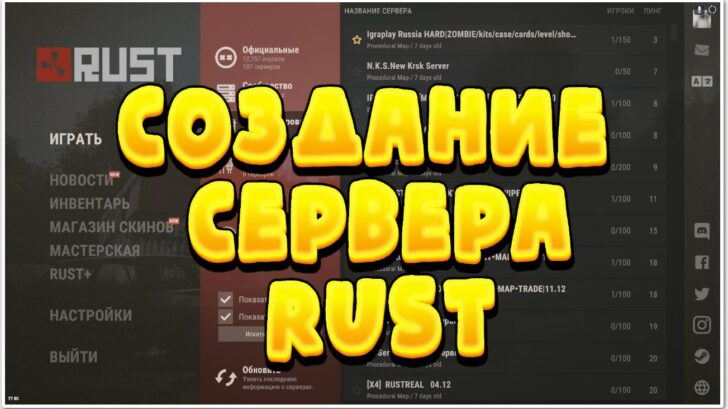
Как создать свой сервер Раст / Rust 2020 и установить плагины на своём ПК бесплатно
11.12.2020 12 Комментариев
Сейчас я расскажу как создать свой сервер Раст / Rust 2020 и установить на него плагины. А также как стать администратором сервера. Запускается это всё на своём ПК бесплатно, у которого должно быть не меньше 4гб оперативки для небольшого сервера.
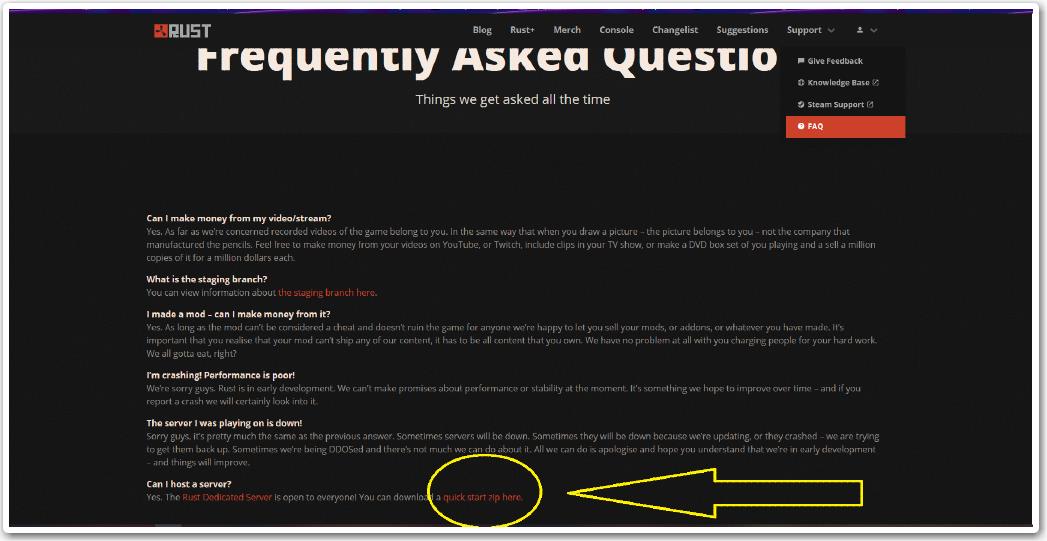
Скачать сервер Раст
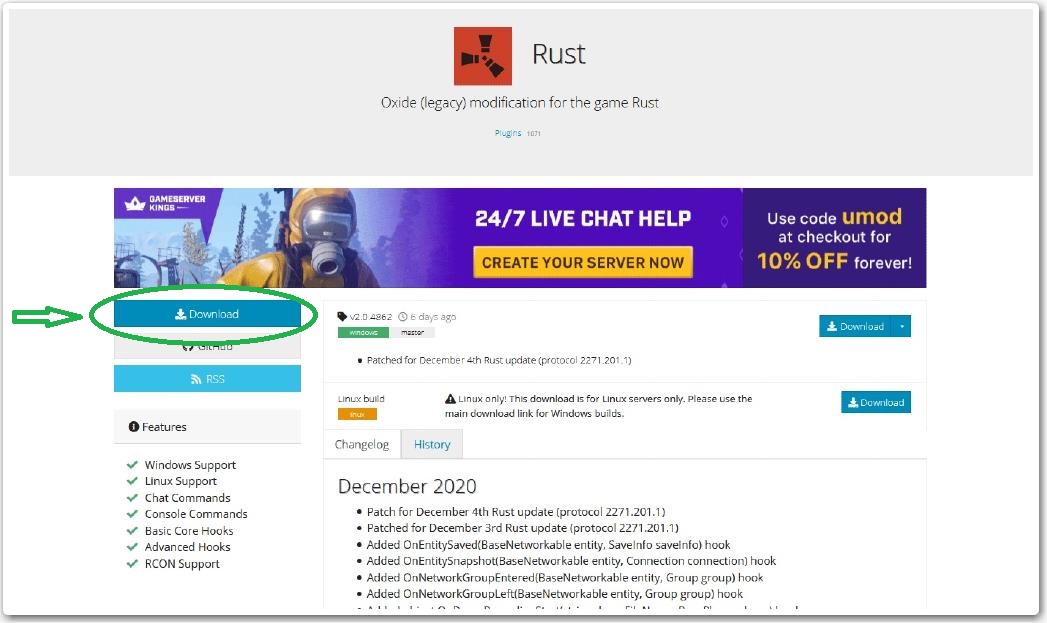
Установка сервера Rust и Umod / Oxide
Сначала разархивируем Rust_Server. Затем запустим Run_DS ждём окончания загрузки пока сервер Rust не запустится. Это он у тебя уже работает в неофициальных. Но стоит ещё настроить и постаить оксид. Поэтому выключаем его набрав команду “quit” в консоле запуска. Теперь разархивируем второй архив Oxide Rust и RustDedicated_Data переносим на сервер с заменой файлов в папку rustds.
Настройка Run_DS bat – бантика для запуска
Для настройки батника тебе понадобится любой блокнот. Удаляем эти строки отвечаеющие за обнову при каждом запуске и отключении, поначалу незачем эта функция:
Далее настраиваем всё под себя с помощью специальных команд, я использую только основные. У меня получилось вот так:
Естественно вместо русских слов вставляем своё, по настройке батника можешь задавать вопросы в комментариях, если что не понятно. 🙄 Кстате карту можешь выбрать себе сам на свой вкус и цвет, ссылку найдёшь также с другими, когда нажмёшь скачать внизу.
Устанавливаем плагины umod / oxide на сервер Раст
Как сделать себя админом
Пиши в консоль сервера Ownerid «SteamID игрока» и всё, стим айди твой естественно! Теперь ты можешь заказывать в игре себе предметы через консоль выдачи. Теперь остаётся понять какие ты хочешь чтобы у тебя были плагины oxide и добавить себе в раст.
Вот такие три мода на сервер Rust, которые должны залететь, как нельзя лучше. Удачи в выживании. 😎
Rust:Тонкости администрирования сервера uMod или Oxide
Содержание

Rust:Тонкости администрирования сервера uMod или Oxide
Короткая ссылка
Начало
Введение
Требования к серверу
Требования к платформе uMod варьируются в зависимости от игрового сервера.
Дополнительную информацию о поддержке uMod для определенных игр можно найти на сайте uMod
Установка uMod/Oxide
Загрузка по прямой ссылке
Плагины
Расширения
Получение дополнительной информации
Поиск
Пожалуйста, пользуйтесь поиском прежде чем создавать новые темы.
Плагины и расширения
При возникновении проблем:
Плагины
Файлы плагина
Установка
Конфигурирование плагина
Большинство плагинов во время установки генерируют JSON конфигурационный файл, в котором можно настраивать работу плагина.
Разрешения плагинов (permissions)
Многие плагины включают в себя различные разрешения, которые должны быть назначены для использования функций, предоставляемых плагином.
Команды плагинов
Многие плагины будут включать команды, которые могут использоваться игроками или администраторами сервера. Не каждая игра будет иметь оба типа команд, и по умолчанию команды могут быть доступны для консоли и в игре (если она доступна).
Консольные команды
Консольная команда это команда, которая запускается из:
Установка плагинов
Установка uMod плагинов занимает всего пару щелчков мыши.
Требования сервера
Чтобы установить плагин на сервер, сервер должен поддерживать Oxide 2.0 или выше, иначе плагины не будут загружаться или делать что-либо.
Загрузка исходного кода
Не переименовывайте плагин и не изменяйте его расширение.
Удалённое управление
Если сервер расположен не локально, тогда подключитесь к серверу с помощью FTP client. Данные для подключения уточните у технической поддержки хостинга.
Папка плагинов
Загрузка исходного кода
Загрузите плагин в папку «plugins», и он автоматически загрузится если плагин рабочий и мод Oxide установлен правильно
Обновление
Если плагин уже установлен и доступно обновление, просто перезапишите исходный файл (.cs) в папке plugins, и новая версия будет загружена автоматически.
Конфигурация плагина
Большинство плагинов во время загрузки генерируют JSON конфигурацию. С помощью этого файла (конфигурации) администраторы могут настроить работу плагина.
Папка конфигураций
Имя файла
Файл конфигурации плагина имеет то же имя, что и сам плагин.
Например, плагин, с названием MyPlugin.cs (если он имеет конфигурацию) будет иметь конфиг с названием MyPlugin.json
Не переименовывайте файлы конфигов и не меняйте их расширение.
Если плагин установлен, но не настраивается, файл конфигурации не будет создан.
Синтаксис файлов конфигурации JSON
Все файлы конфигурации плагина сохраняются в формате JSON (JavaScript Object Notation). Конфигурационные файлы не должны ошибок в синтаксисе. Используйте валидатор типа jsonlint.com для проверки конфигов.
Применение изменений
Разрешения плагинов (permissions)
Разрешения позволяют владельцам серверов предоставлять игрокам уникальные возможности и преимущества на своих серверах.
Администрировать разрешения просто: просто введите нужную команду, и все готово! Если на вашем сервере нет консоли, вы можете использовать любой совместимый инструмент RCON или удаленную консоль для отправки команд на сервер. Большинство игр с поддержкой Oxide / uMod также поддерживают команды разрешений в чате или будут доступны в ближайшее время.
По умолчанию группы, которые создаются Oxide / uMod это: admin и default. Их можно изменить, отредактировав их в файле umod.config.json, или с помощью команд консоли если используете мод Oxide. Группа администраторов будет автоматически назначена игрокам, которые распознаются сервером как администратор. Группа «по умолчанию» будет автоматически назначена ВСЕМ игрокам, которые подключаются к серверу.
Игроки
Предоставить разрешение отдельному игроку
oxide.grant player Wulf epicstuff.use
Отозвать разрешение у отдельного игрока
oxide.revoke player Wulf epicstuff.use
Показать разрешения игрока
oxide.show player Wulf
Показывает, у какого игрока или группы есть разрешение
Иногда эта команда полезна при отслеживании того, у кого есть разрешение.
oxide.show perm epicstuff.use
Группы
Предоставить разрешение всей группе
oxide.grant group admin epicstuff.use
Отменить разрешение от группы
oxide.revoke group admin epicstuff.use
Добавление игрока в существующую группу
Добавление игрока в группу даст им все разрешения, назначенные этой группе.
oxide.usergroup add Wulf admin
Удаление игрока из существующей группы
Удаление игрока из группы приведет к удалению из него всех разрешений, назначенных этой группе..
oxide.usergroup remove Wulf admin
Добавление совершенно новой группы
oxide.group add vip
Удаление существующей группы
oxide.group remove vip
Установка названия или звания группы
oxide.group set vip «[VIP Member]» 1
Установка родительской группы другой группы
Группа унаследует все разрешения от своей родительской группы.
oxide.group parent admin default
Отображение членов группы и разрешений
oxide.show group admin
Отображение всех групп или разрешений
Чтобы показать все группы разрешений, просто используйте команду ниже.
Показать все зарегистрированные разрешения от плагинов и Oxide / uMod, используйте команду ниже.
Использование подстановочных знаков
oxide.grant group admin *, oxide.grant player Wulf umod.*
Выводы
Те же команды также доступны с префиксом «o.» (ex. «o.grant»).
Это основы разрешений для Oxide / uMod. Разрешения дают вам фантастический способ управления игроками, не беспокоясь о том, что они будут злоупотреблять полномочиями функций администратора игры (такими как полет, noclip, суперскорость и т.д.).
Файлы данных
Папка Data
Названия файлов
Файлы данных не следуют никаким соглашениям об именах, автор плагина может указать любое имя при создании файла данных.
Синтаксис файлов данных JSON
Все файлы данных плагинов хранятся в файле типа JSON (JavaScript Object Notation). Фалы данных не должны иметь синтаксических ошибок. При редактировании файла вручную используйте валидатор, например jsonlint.com
Ссылки

Rust:Тонкости администрирования сервера uMod или Oxide
Поиск
uMod/Oxide Permissions System
Many of the special features added by plugins in the game Rust will not automatically work for players or groups, unless special «permissions» are given to use them.
You do this by connecting to the server with an RCON tool, and giving special commands to the server, which are used by an entire permissions system that is built into the uMod/Oxide plugin framework. When a player or group has the correct permissions tags added in this permissions system, they will be allowed to use the special abilities or features of the plugin.
Not all plugins require these permissions tags. Some plugins work automatically for all players, as soon as they are added to the server. But if any plugin adds special powers you don’t want everyone to have (turn invisible, walk through walls, etc), then you need to use the permissions system and the permissions tags to control who can and cannot use those plugin abilities.
An Important Thing About Permissions Systems
Like almost all permissions systems, its automatic answer to «can someone use this ability?» is «NO. «. A really big loud «NO!«. The automatic default answer of permissions systems is to say NO. All the time, every time, to any request to use anything. Forever. Unless you have added a «Yes» answer to their permissions, which allows them to use it.
The vast majority of plugins will not work at all until you add permissions for them, either to each individual player or to a whole group (that the player belongs to). Until you add permissions, every time you try to use a command, the uMod/Oxide permissions system will just keep saying «nope, nada, uh uh, ain’t gettin’ past me, not happenin’, not on my watch!». That is it’s job, it’s designed to say NO.
Does a Plugin Have Permissions?
When you view a plugin on uMod, if there is a section in the description that begins with «# Permissions», then yes it does. Underneath that will be listed the permissions and what they do.
Some are more complex, a lot more complex. Below are the permissions for the «Vanish» plugin.

This one is a little trickier!
The basic vanish.use is needed to even use the invisibility, without that permissions, you can’t even turn invisible. But then the other settings change how it works.
How to Add Permissions
Before you can add permissions, there’s a few things you need to set up beforehand. We have guides in our knowledgebase on most of this already, so rather then repeat it all, there are links below for each step.
You Need an RCON Tool
Without an RCON, your Rust server is like a car with no steering wheel. Or a brake pedal, gas pedal, speedometer, gas gauge, or even knobs on the radio. You pretty much can’t do anything on your Rust server, without some kind of RCON program. The RCON is how you send instructions to the server (and Oxide too) on what to do, and see feedback on what it’s doing behind the scenes.
Our guide on how to install and setup «RustAdmin», which is one of many different RCON tools, is here: https://nodecraft.com/support/games/rust/setting-up-the-rust-admin-rcon-tool
Become an Admin First
We have a guide on how to set yourself as an admin on your Rust server here: https://nodecraft.com/support/games/rust/become-admin-on-a-nodecraft-rust-server
Groups! Groups! Groups!
The more efficient way to add permissions, is to create a group first, and then assign permissions to the entire group. Then you set which players are in that group.
This is more work in the beginning, but pays off BIG TIME in the long run. When you want to make changes, you just edit the permissions for the whole group, and it changes on all the players in that group. As opposed to having to go into each separate player and add, delete, or change the permissions, and then the next player, and the next player.
Additionally, using groups is a good way to not forget you left a permissions turned by accident. As an example…
Let’s say, you passed a permission out like candy one day, but then later on you decided it was too powerful and removed it from everyone’s list. Except, you forgot bob. Bob hasn’t played in a long time. Bob was kind of a… well, you know what. You were glad when Bob stopped playing.
But out of the blue, Bob does join the server, realizes they still have this superpower (like turn invisible), and goes on a rampage across the server. Oof. Big mess. Many unhappy players. Much griping is heard unto the admins (even less time playing, while you clean up the mess). Using groups are a great way to make sure you don’t accidentally leave an ability turned on. Change it in one place, change it for everyone.
uMod/Oxide Commands
In the following sections are the commands for the uMod/Oxide permissions system. Theses commands are universal to uMod by the way, so they will work in any other game using uMod, not just Rust.
The and > are not typed as part of the command.
In the commands you can also use a username or a Steam64ID number. We prefer to use the Steam64ID number, but they’re not exactly user friendly, and if you have many players it can be hard to remember which number is which player.
For example the command:
Adding and Removing Permissions for Players
oxide.grant
This command will add a permission to a player.
oxide.revoke
This command will remove a permission from a player.
The Permissions Wildcard
If you replace the permission with just an asterisk ( * ), it gives that player access to ALL permissions installed on the server. Use that carefully; that can get scary.
Adding and Removing Permissions for Groups
These are basically the same command from the player section, but «user» is replaced with «group»
oxide.grant
This command will add a permission to a group.
oxide.revoke
This command will remove a permission from a group.
The Permissions Wildcard
Just like with a single player, if you replace the permission with just an asterisk ( * ), it gives that entire group access to ALL permissions installed on the server. In the case of an entire group, this is even scarier then a single player with the wildcard.
Listing Permissions for Players and Groups
oxide.show player
Shows all the permissions granted to a specific player
oxide.show perm
This will show all players or groups which have been granted a specific permission.
Creating and Removing Groups
uMod/Oxide has two default groups «user» and «admin», any other groups you wish to have will have to be created.
oxide.group add
This command will create a whole new group, with whatever text you use for
oxide.group remove
This command will remove an existing group
oxide.group parent
This command sets the parent and/or child group for a group. This is useful for inheriting default permissions from one group to another, which is a faster and easier way to set up permissions for multiple groups. All the permissions of a «parent» group will be automatically be given to the «child» group, so you can quickly stack up groups, and only add new permissions to each new one. This greatly reduces the amount of work required to create groups.
oxide.group set
This creates a short description for a group, which can be used for things like chat titles
Only replace the sample text portion. The » [ and ] » are part of the command.
Adding and Removing Players from Groups
oxide.usergroup add
This command will add a player to a specific group
oxide.usergroup remove
This command will remove a player from a group
Related Articles
Can’t find answers to your questions?
Feel free to contact our support team for personal and professional help.
Как установить umod rust
uMod is free, open source software distributed under the MIT License. We accept and encourage contributions from our community, and sometimes give cookies in return.
While we recommend using one of the official release builds, you can compile your own builds if you’d like. Keep in mind that only official builds are supported by the uMod team and community. Good luck!
Download a Git client such as GitHub Desktop or SourceTree.
Clone the repo https://github.com/theumod/umod.Rust.git (recommended) or download and extract the latest zip archive.
Download and install Visual Studio 2017 (community is free, but any edition will work) if you do not have it installed already.
Update or install PowerShell 5.x (if it isn’t already) for use with the game file downloading and patching process.
Open the uMod.sln solution file in Visual Studio 2017.
Build the solution. If you get errors, you’re likely not using the latest Visual Studio 2017; which is required as uMod uses some C# 6.0 features.
Copy the files from the Bundles directory for your game of choice to your server installation, then just start the server!
Reporting Security Issues
Please disclose security issues responsibly by emailing security@umod.org with a full description. We’ll work on releasing an updated version as quickly as possible. Please do not email non-security issues; use the forums or issue tracker instead.
About
Rust extension for the uMod modding framework