Как установить open core
Ryzen and Threadripper(17h and 19h)
So making a config.plist may seem hard, it’s not. It just takes some time but this guide will tell you how to configure everything, you won’t be left in the cold. This also means if you have issues, review your config settings to make sure they’re correct. Main things to note with OpenCore:
Now with all that, a quick reminder of the tools we need
And read this guide more than once before setting up OpenCore and make sure you have it set up correctly. Do note that images will not always be the most up-to-date so please read the text below them, if nothing’s mentioned then leave as default.

This is where you’ll add SSDTs for your system, these are very important to booting macOS and have many uses like USB maps, disabling unsupported GPUs and such. And with our system, it’s even required to boot. Guide on making them found here: Getting started with ACPI
| Required SSDTs | Description |
|---|---|
| SSDT-EC-USBX | Fixes both the embedded controller and USB power, see Getting Started With ACPI Guide for more details. |
| SSDT-CPUR | Fixes CPU definitions with B550 and A520 motherboards, do not use if you don’t have an AMD B550 or A520 system. You can find a prebuilt here: SSDT-CPUR.aml |
Note that you should not add your generated DSDT.aml here, it is already in your firmware. So if present, remove the entry for it in your config.plist and under EFI/OC/ACPI.
This blocks certain ACPI tables from loading, for us we can ignore this.
This section allows us to dynamically modify parts of the ACPI (DSDT, SSDT, etc.) via OpenCore. For us, our patches are handled by our SSDTs. This is a much cleaner solution as this will allow us to boot Windows and other OSes with OpenCore
Settings relating to ACPI, leave everything here as default as we have no use for these quirks.

This section is dedicated to quirks relating to boot.efi patching with OpenRuntime, the replacement for AptioMemoryFix.efi
This section is allowing spaces to be passthrough to macOS that are generally ignored, useful when paired with DevirtualiseMmio
. tip Info Settings relating to boot.efi patching and firmware fixes, for us, we need to change the following:
| Quirk | Enabled | Comment |
|---|---|---|
| DevirtualiseMmio | NO | Note TRx40 requires this flag |
| EnableWriteUnprotector | NO | |
| RebuildAppleMemoryMap | YES | |
| SetupVirtualMap | YES | — Note B550, A520 and TRx40 boards should disable this. Newer BIOS versions of X570 also require this off — X470 and B450 with late 2020 BIOS updates also require this disabled |
| SyncRuntimePermissions | YES | |
| . |
. details More in-depth Info

Sets device properties from a map.
By default, the Sample.plist has this section set for iGPU and Audio. We have no iGPU so PciRoot PciRoot(0x0)/Pci(0x2,0x0) can be removed from Add section. For audio we’ll be setting the layout in the boot-args section, so removal of PciRoot(0x0)/Pci(0x1b,0x0) is also recommended from both Add and Block sections
TL;DR, delete all the PciRoot’s here as we won’t be using this section.
Removes device properties from the map, for us we can ignore this
Here’s where we specify which kexts to load, in what specific order to load, and what architectures each kext is meant for. By default we recommend leaving what ProperTree has done, however for 32-bit CPUs please see below:
. details More in-depth Info
The main thing you need to keep in mind is:
A reminder that ProperTree users can run Cmd/Ctrl + Shift + R to add all their kexts in the correct order without manually typing each kext out.
. details Kernel Support Table
| OS X Version | MinKernel | MaxKernel |
|---|---|---|
| 10.4 | 8.0.0 | 8.99.99 |
| 10.5 | 9.0.0 | 9.99.99 |
| 10.6 | 10.0.0 | 10.99.99 |
| 10.7 | 11.0.0 | 11.99.99 |
| 10.8 | 12.0.0 | 12.99.99 |
| 10.9 | 13.0.0 | 13.99.99 |
| 10.10 | 14.0.0 | 14.99.99 |
| 10.11 | 15.0.0 | 15.99.99 |
| 10.12 | 16.0.0 | 16.99.99 |
| 10.13 | 17.0.0 | 17.99.99 |
| 10.14 | 18.0.0 | 18.99.99 |
| 10.15 | 19.0.0 | 19.99.99 |
| 11 | 20.0.0 | 20.99.99 |
| 12 | 21.0.0 | 21.99.99 |
Needed for spoofing unsupported CPUs like Pentiums and Celerons and to disable CPU power management on unsupported CPUs (such as AMD CPUs)
| Quirk | Enabled |
|---|---|
| DummyPowerManagement | YES |
. details More in-depth Info
. details Kernel Support Table
| OS X Version | MinKernel | MaxKernel |
|---|---|---|
| 10.4 | 8.0.0 | 8.99.99 |
| 10.5 | 9.0.0 | 9.99.99 |
| 10.6 | 10.0.0 | 10.99.99 |
| 10.7 | 11.0.0 | 11.99.99 |
| 10.8 | 12.0.0 | 12.99.99 |
| 10.9 | 13.0.0 | 13.99.99 |
| 10.10 | 14.0.0 | 14.99.99 |
| 10.11 | 15.0.0 | 15.99.99 |
| 10.12 | 16.0.0 | 16.99.99 |
| 10.13 | 17.0.0 | 17.99.99 |
| 10.14 | 18.0.0 | 18.99.99 |
| 10.15 | 19.0.0 | 19.99.99 |
| 11 | 20.0.0 | 20.99.99 |
| 12 | 21.0.0 | 21.99.99 |
Used for loading kexts off system volume, only relevant for older operating systems where certain kexts are not present in the cache(ie. IONetworkingFamily in 10.6).
For us, we can ignore.
Blocks certain kexts from loading. Not relevant for us.
This is where the AMD kernel patching magic happens. Please do note that KernelToPatch and MatchOS from Clover becomes Kernel and MinKernel / MaxKernel in OpenCore, you can find pre-made patches by AlGrey(algrey#9303).

Where is replaced with the physical core count of your CPU in hexadecimal. For example, an 8-Core 5800X would have the new Replace value be:
. details Core Count => Hexadecimal Table
| Core Count | Hexadecimal |
|---|---|
| 4 Core | 04 |
| 6 Core | 06 |
| 8 Core | 08 |
| 12 Core | 0C |
| 16 Core | 10 |
| 24 Core | 18 |
| 32 Core | 20 |
| 64 Core | 40 |
Settings relating to the kernel, for us we’ll be enabling the following:
| Quirk | Enabled | Comment |
|---|---|---|
| PanicNoKextDump | YES | |
| PowerTimeoutKernelPanic | YES | |
| ProvideCurrentCpuInfo | YES | |
| XhciPortLimit | YES | Disable if running macOS 11.3+ |
. details More in-depth Info
AppleCpuPmCfgLock: NO
AppleXcpmCfgLock: NO
AppleXcpmExtraMsrs: NO
CustomSMBIOSGuid: NO
DisableIoMapper: NO
DisableLinkeditJettison: YES
DisableRtcChecksum: NO
ExtendBTFeatureFlags NO
LapicKernelPanic: NO
LegacyCommpage: NO
PanicNoKextDump: YES
PowerTimeoutKernelPanic: YES
ProvideCurrentCpuInfo: YES
XhciPortLimit: YES
Settings related to legacy booting(ie. 10.4-10.6), for majority you can skip however for those planning to boot legacy OSes you can see below:
. details More in-depth Info
FuzzyMatch: True
KernelArch: x86_64
KernelCache: Auto

Settings for boot screen (Leave everything as default).
Helpful for debugging OpenCore boot issues(We’ll be changing everything but DisplayDelay ):
| Quirk | Enabled |
|---|---|
| AppleDebug | YES |
| ApplePanic | YES |
| DisableWatchDog | YES |
| Target | 67 |
. details More in-depth Info
These values are based of those calculated in OpenCore debugging
Security is pretty self-explanatory, do not skip. We’ll be changing the following:
| Quirk | Enabled | Comment |
|---|---|---|
| AllowNvramReset | YES | |
| AllowSetDefault | YES | |
| BlacklistAppleUpdate | YES | |
| ScanPolicy | 0 | |
| SecureBootModel | Default | Leave this as Default if running macOS Big Sur or newer. The next page goes into more detail about this setting. |
| Vault | Optional | This is a word, it is not optional to omit this setting. You will regret it if you don’t set it to Optional, note that it is case-sensitive |
. details More in-depth Info
AllowNvramReset: YES
AllowSetDefault: YES
ApECID: 0
AuthRestart: NO
BlacklistAppleUpdate: YES
DmgLoading: Signed
ExposeSensitiveData: 6
Vault: Optional
ScanPolicy: 0
SecureBootModel: Disabled
Used for running OC debugging tools like the shell, ProperTree’s snapshot function will add these for you.
Used for specifying irregular boot paths that can’t be found naturally with OpenCore.
Won’t be covered here, see 8.6 of Configuration.pdf for more info

Used for OpenCore’s UI scaling, default will work for us. See in-depth section for more info
. details More in-depth Info
Booter Path, mainly used for UI Scaling
UIScale:
DefaultBackgroundColor: Background color used by boot.efi
OpenCore’s NVRAM GUID, mainly relevant for RTCMemoryFixup users
. details More in-depth Info
System Integrity Protection bitmask
csr-active-config: 00000000
run-efi-updater: No
prev-lang:kbd: <>
Forcibly rewrites NVRAM variables, do note that Add will not overwrite values already present in NVRAM so values like boot-args should be left alone. For us, we’ll be changing the following:
| Quirk | Enabled |
|---|---|
| WriteFlash | YES |
. details More in-depth Info
LegacyEnable: NO
LegacyOverwrite: NO
LegacySchema
WriteFlash: YES

For setting up the SMBIOS info, we’ll use CorpNewt’s GenSMBIOS application.
For this example, we’ll choose the iMacPro1,1 SMBIOS but some SMBIOS play with certain GPUs better than others:
Run GenSMBIOS, pick option 1 for downloading MacSerial and Option 3 for selecting out SMBIOS. This will give us an output similar to the following:
The order is Product | Serial | Board Serial (MLB)
Reminder that you want either an invalid serial or valid serial numbers but those not in use, you want to get a message back like: «Invalid Serial» or «Purchase Date not Validated»
Automatic: YES
. details More in-depth Info
AdviseFeatures: NO
MaxBIOSVersion: NO
ProcessorType: 0
SpoofVendor: YES
SystemMemoryStatus: Auto
UpdateDataHub: YES
UpdateNVRAM: YES
UpdateSMBIOS: YES
UpdateSMBIOSMode: Create

ConnectDrivers: YES
Only drivers present here should be:
By default, OpenCore only loads APFS drivers from macOS Big Sur and newer. If you are booting macOS Catalina or earlier, you may need to set a new minimum version/date. Not setting this can result in OpenCore not finding your macOS partition!
macOS Sierra and earlier use HFS instead of APFS. You can skip this section if booting older versions of macOS.
Both MinVersion and MinDate need to be set if changing the minimum version.
| macOS Version | Min Version | Min Date |
|---|---|---|
| High Sierra ( 10.13.6 ) | 748077008000000 | 20180621 |
| Mojave ( 10.14.6 ) | 945275007000000 | 20190820 |
| Catalina ( 10.15.4 ) | 1412101001000000 | 20200306 |
| No restriction | -1 | -1 |
Related to AudioDxe settings, for us we’ll be ignoring(leave as default). This is unrelated to audio support in macOS.
Related to boot.efi keyboard passthrough used for FileVault and Hotkey support, leave everything here as default as we have no use for these quirks. See here for more details: Security and FileVault
Relating to OpenCore’s visual output, leave everything here as default as we have no use for these quirks.
Mainly relevant for Virtual machines, legacy macs and FileVault users. See here for more details: Security and FileVault
. tip Info Relating to quirks with the UEFI environment, for us we’ll be changing the following:
| Quirk | Enabled | Comment |
|---|---|---|
| UnblockFsConnect | NO | Needed mainly by HP motherboards |
. details More in-depth Info
DisableSecurityPolicy: NO
RequestBootVarRouting: YES
UnblockFsConnect: NO
Used for exempting certain memory regions from OSes to use, mainly relevant for Sandy Bridge iGPUs or systems with faulty memory. Use of this quirk is not covered in this guide
And now you’re ready to save and place it into your EFI under EFI/OC.
For those having booting issues, please make sure to read the Troubleshooting section first and if your questions are still unanswered we have plenty of resources at your disposal:
Special note for 3990X users: macOS currently does not support more than 64 threads in the kernel, and so will kernel panic if it sees more. The 3990X CPU has 128 threads total and so requires half of that disabled. We recommend disabling hyper threading in the BIOS for these situations.
Once done here, we need to edit a couple extra values. Head to the Apple Secure Boot Page
# Создание установщика в macOS
В то время как вам не нужна чистая установка macOS чтобы использовать OpenCore, некоторые пользователи предпочитают иметь свежую версию ОС с обновлением их Boot Manager.
Для начала, мы захотим получить себе копию macOS. Вы можете пропустить этот шаг и перейти к форматированию USB, если вы просто делаете загрузочную флешку с OpenCore, а не установщик. Для всех остальных, вы можете загрузить macOS из App Store или с помощью скрипта от Munki.
# Скачивание macOS: современные версии
С компьютера macOS, отвечающего требованиям версии ОС, которую вы хотите установить, перейдите в App Store и загрузите желаемый релиз ОС и продолжайте настройку установщика.
Для компьютеров, которым нужен конкретный релиз ОС или не удается загрузить из App Store, вы можете использовать утилиту InstallInstallMacOS от Munki.
Чтобы запустить его, просто скопируйте и вставьте следующую команду в терминал:
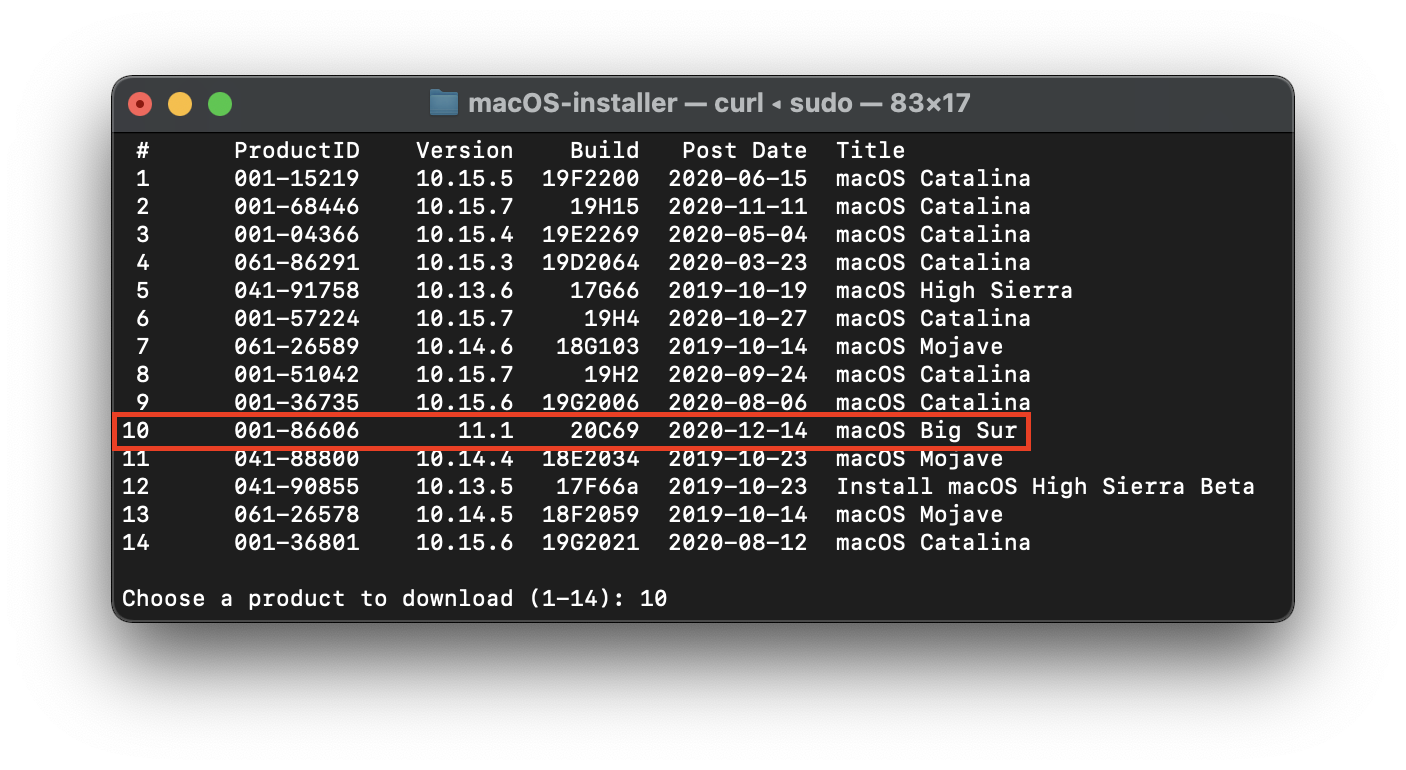
Как вы видите, мы получаем большой список установщиков macOS. Если вам нужна определенная версия macOS, вы можете выбрать её, набрав её номер. Для этого примера, мы выберим 10:
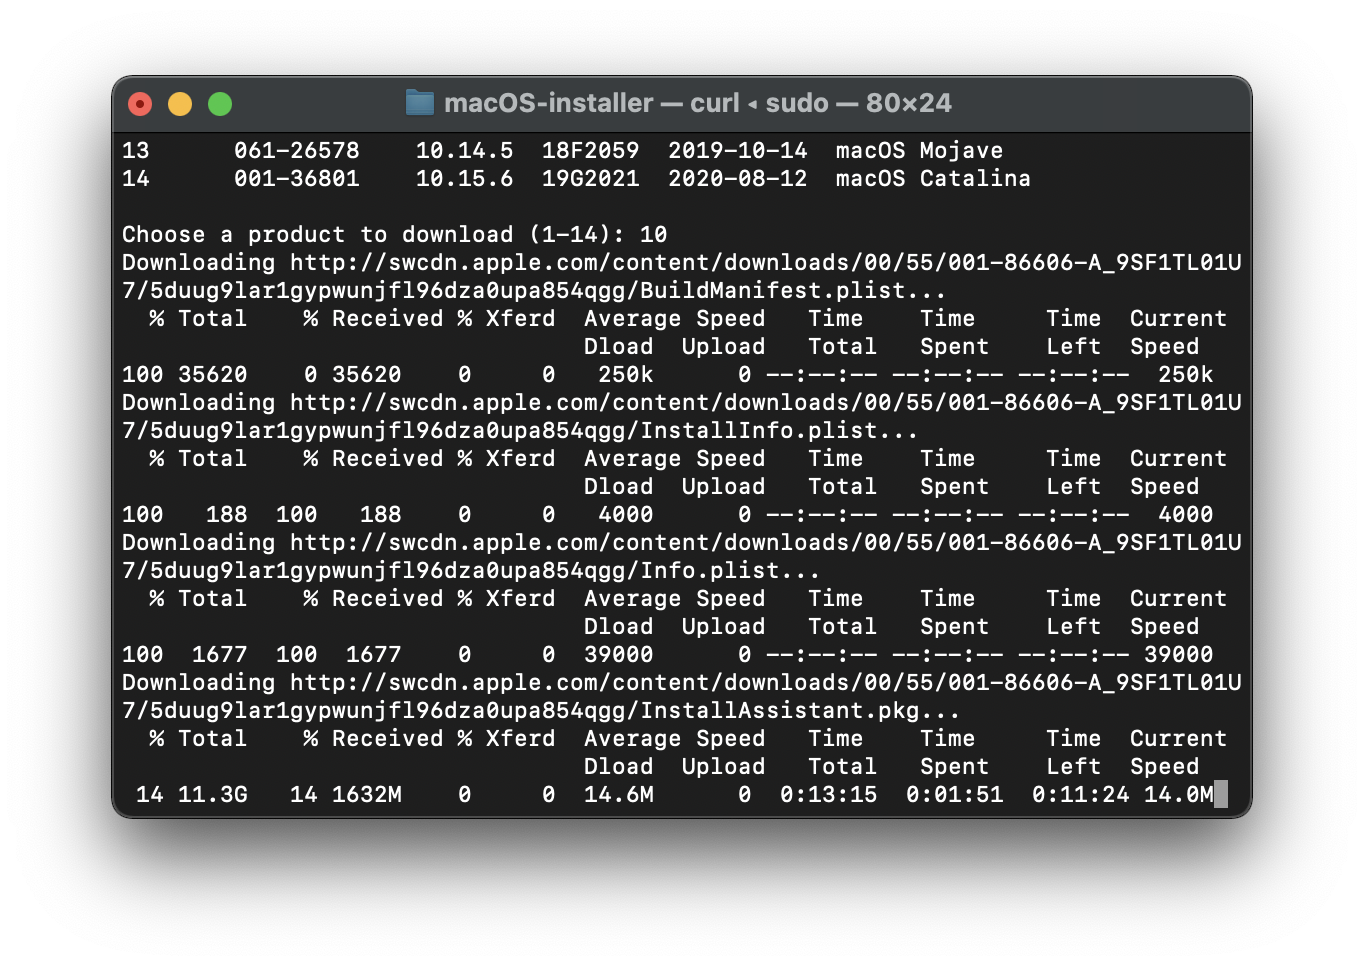
Это займёт некоторое время, поскольку мы загружаем установщик macOS весом 8Гб+, поэтому мы настоятельно рекомендуем прочитать остальную часть руководства, пока вы ждёте.
По завершению, вы найдёте в папке
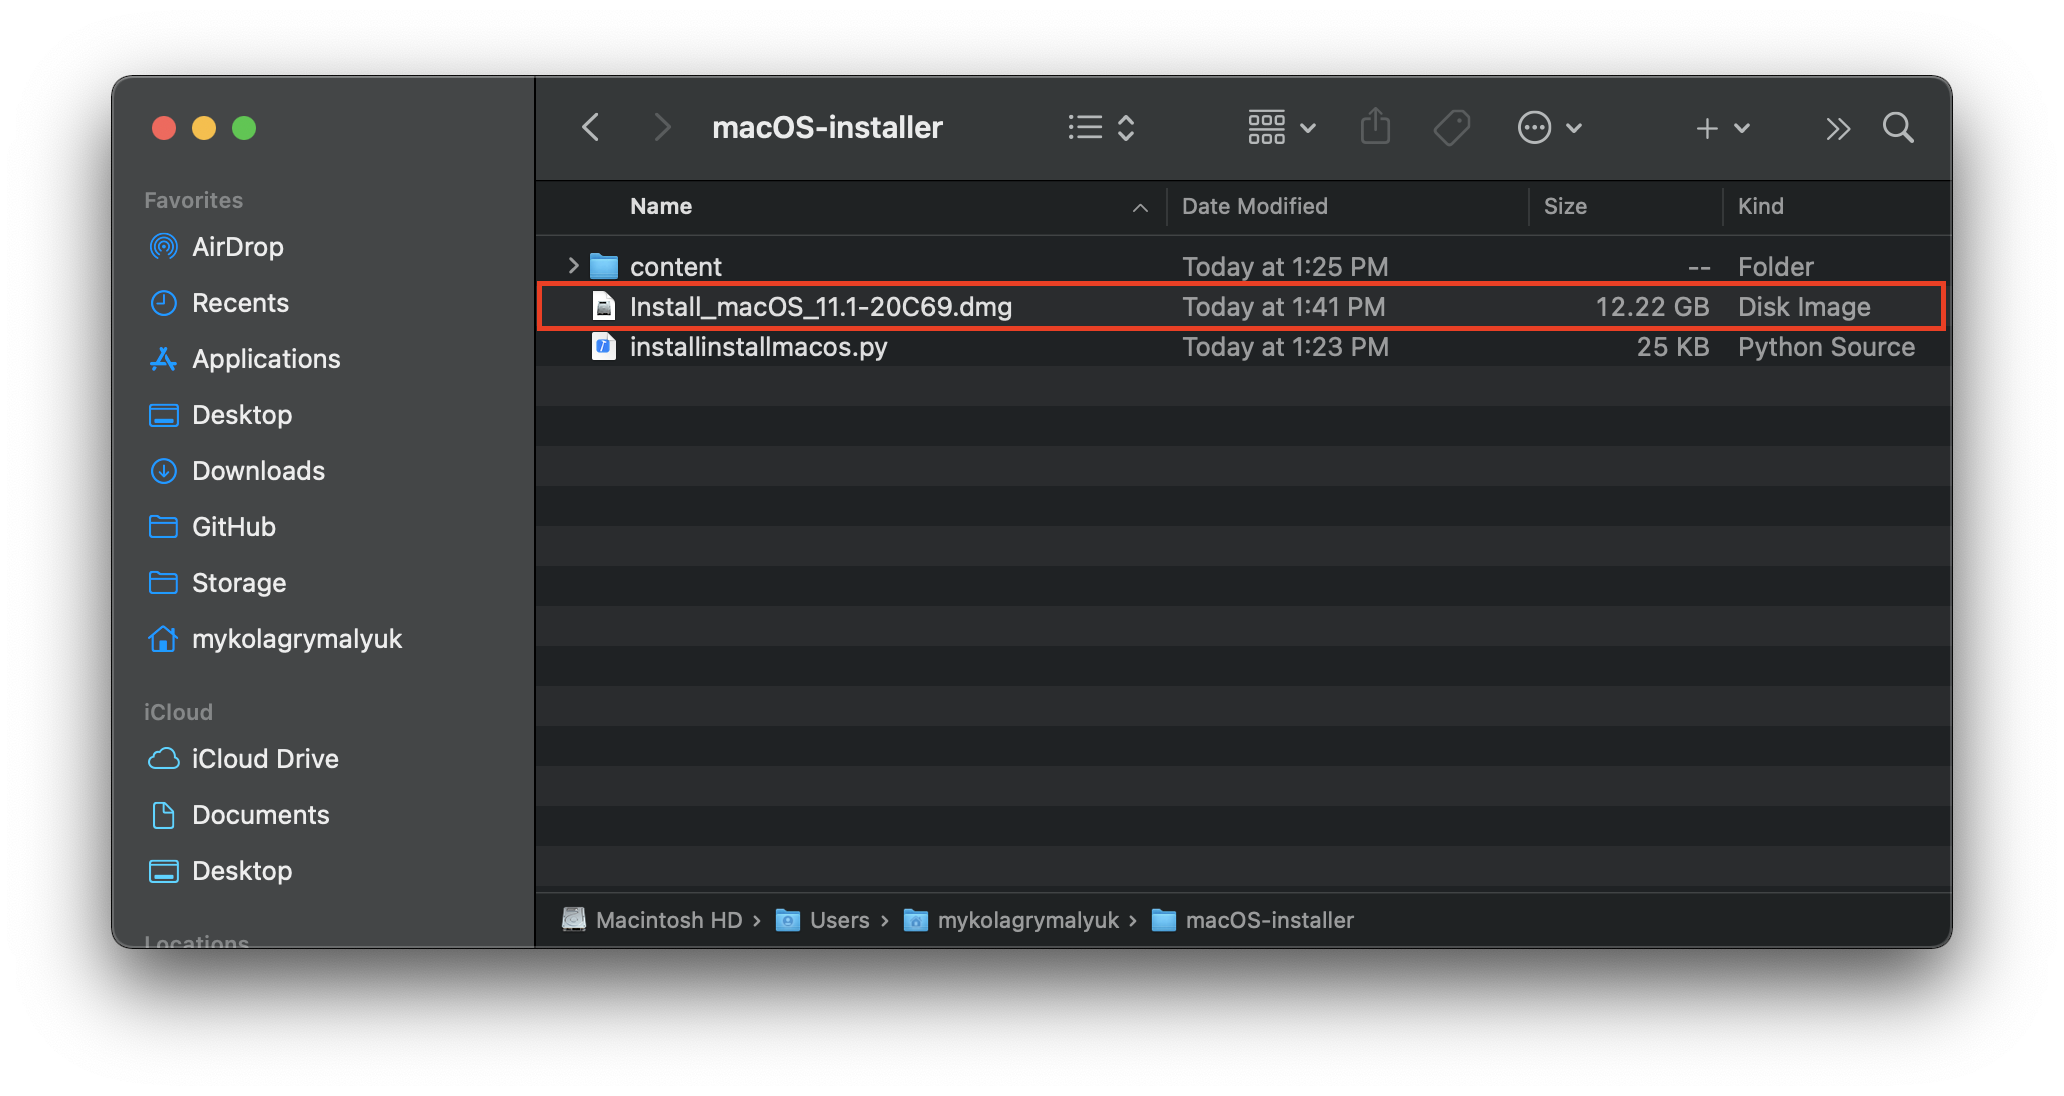
Начиная отсюда, перейдите к Настройке установщика чтобы закончить свою работу.
# Скачивание macOS: устаревшие версии
# Настройка установщика
Затем запустите команду createinstallmedia предоставленную Apple
Это займёт некоторое время, так что вы можете взять чашечку кофе или продолжить читать руководство (честно говоря, вам не стоит следовать этому руководству шаг за шагом, не прочитав это всё сначала).
Также вы можете поменять путь createinstallmedia на тот, где находится ваш установщик (то же самое с названием накопителя)
Устаревшие createinstallmedia команды
# Настройка Legacy
Для систем, не поддерживающих UEFI загрузку, смотрите ниже:
Настройка Legacy загрузки
Для начала, вам понадобится следующее:
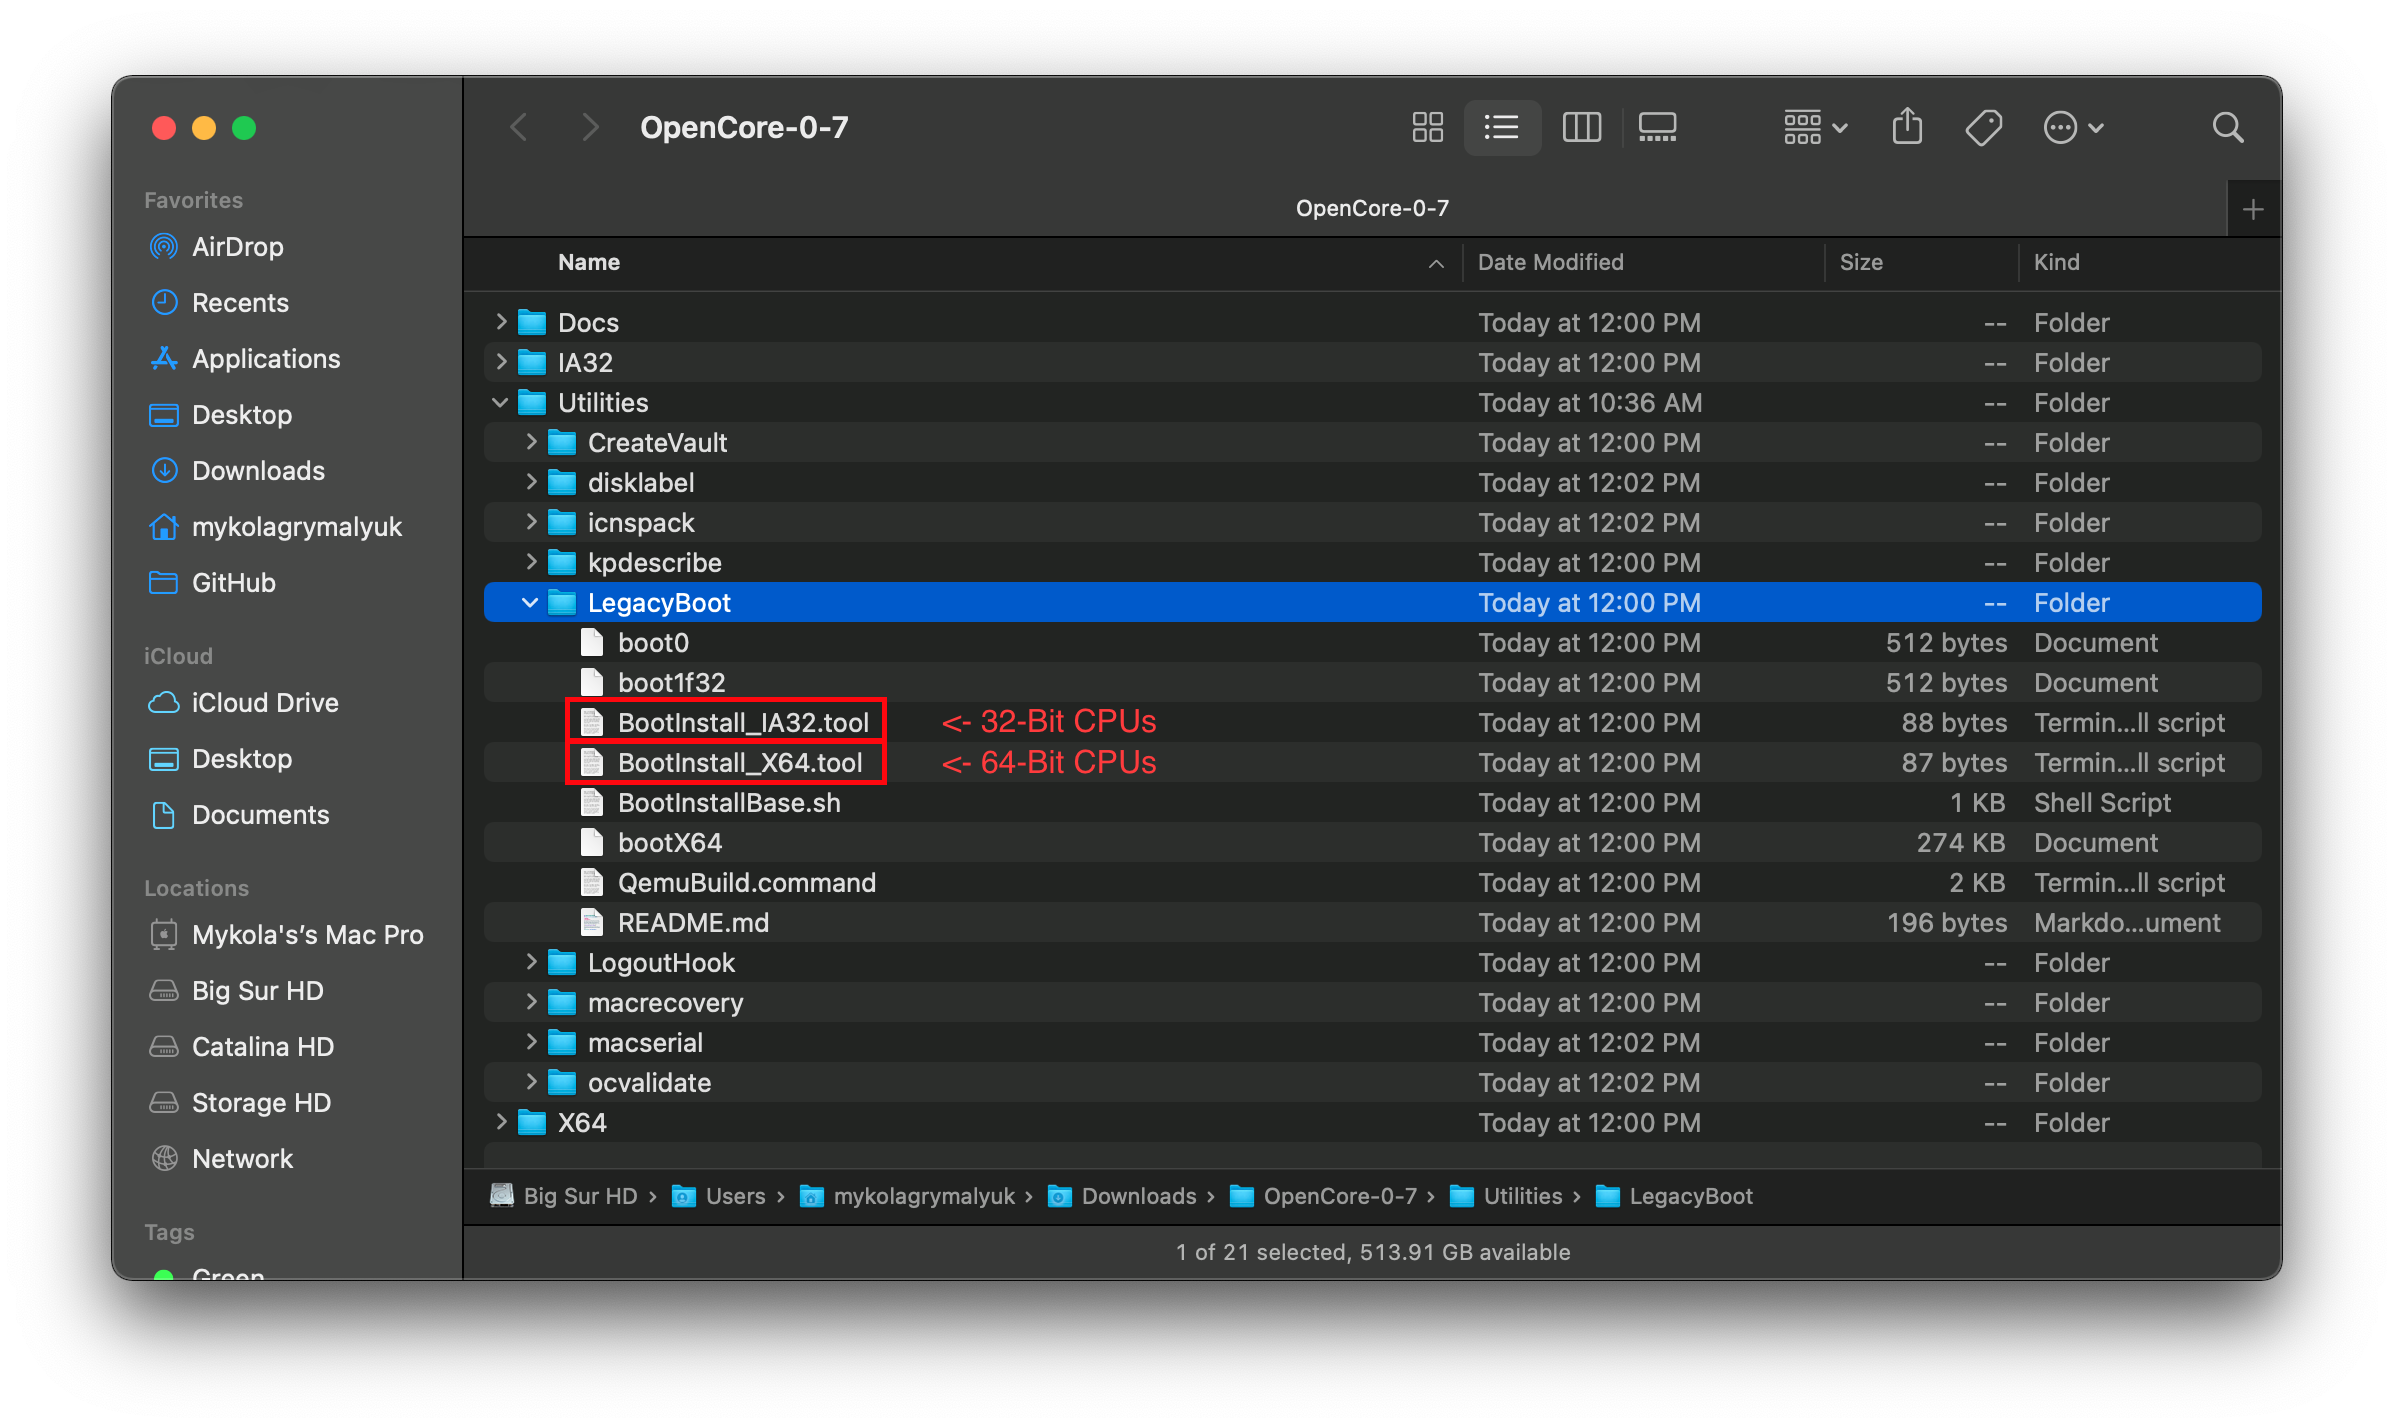
Теперь запустите эту утилиту в терминале в sudo(В противном случае, эта утилита, скорее всего, потерпит неудачу):
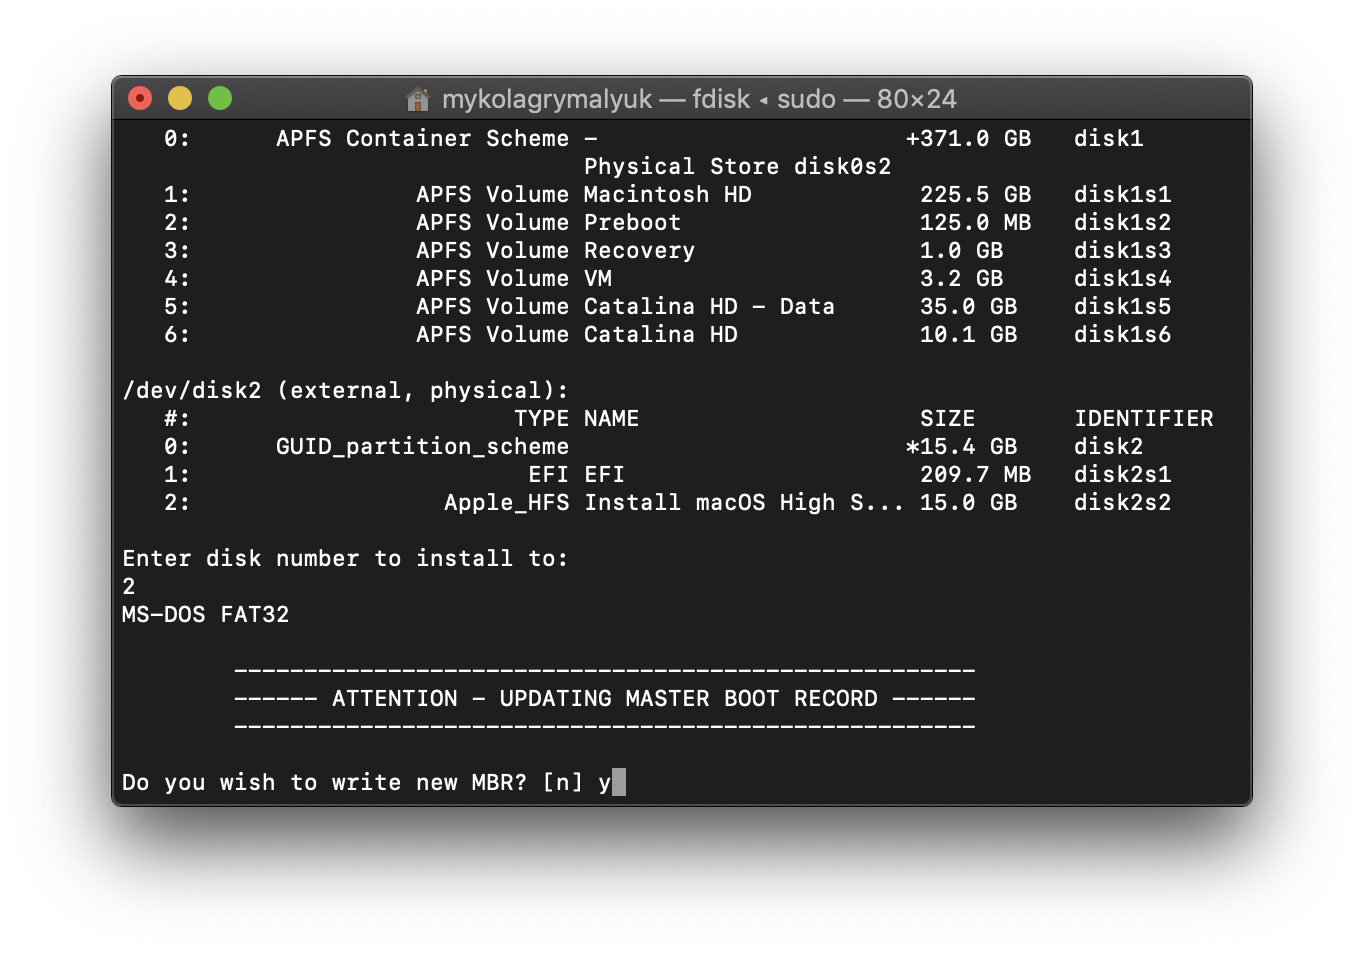
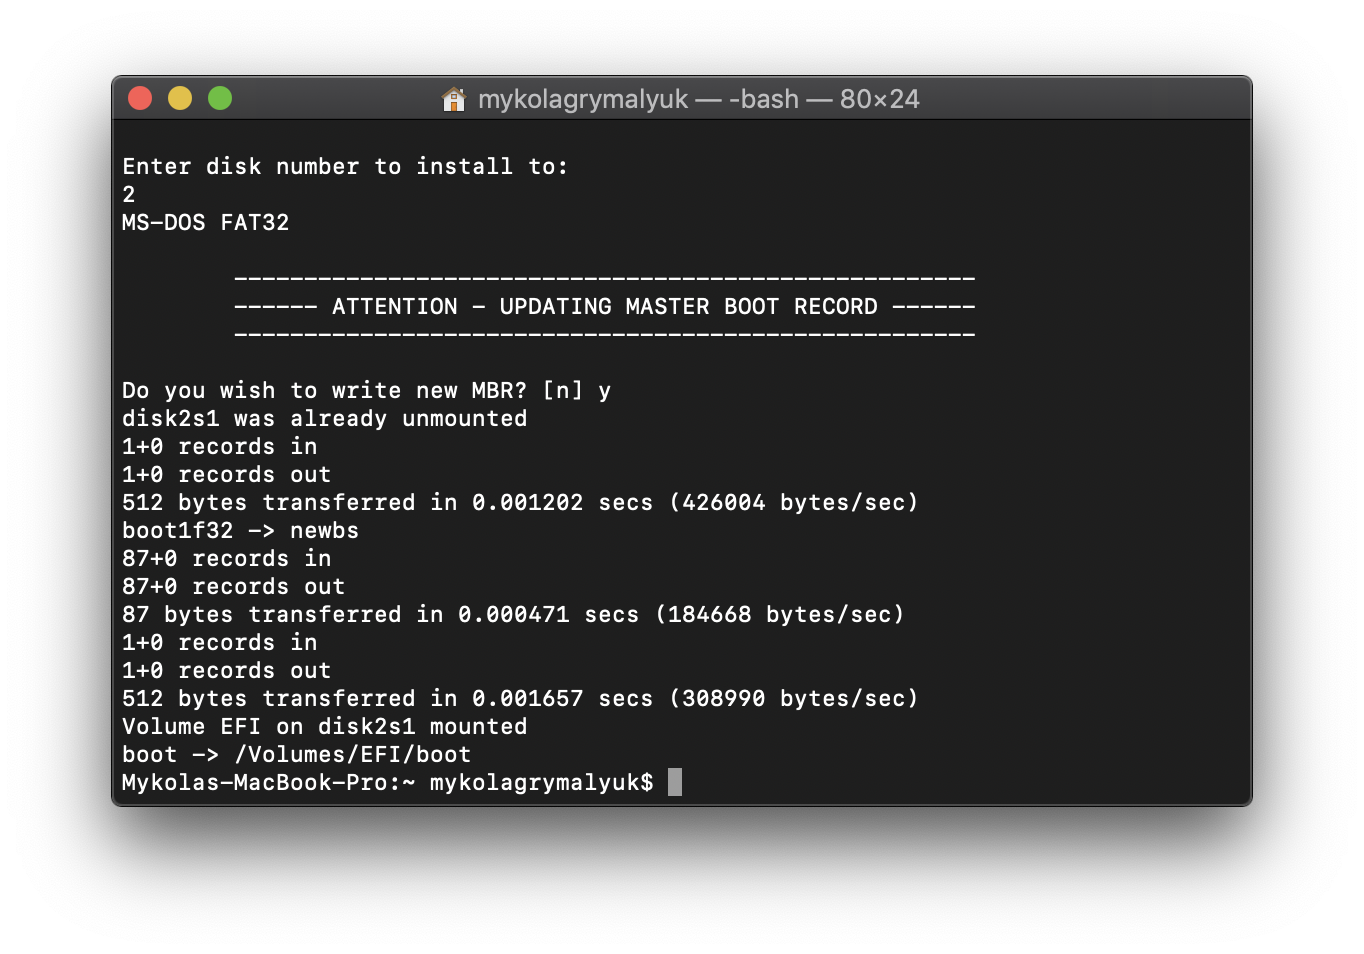
Это даст вам EFI раздел с bootia32 или bootx64 файлом
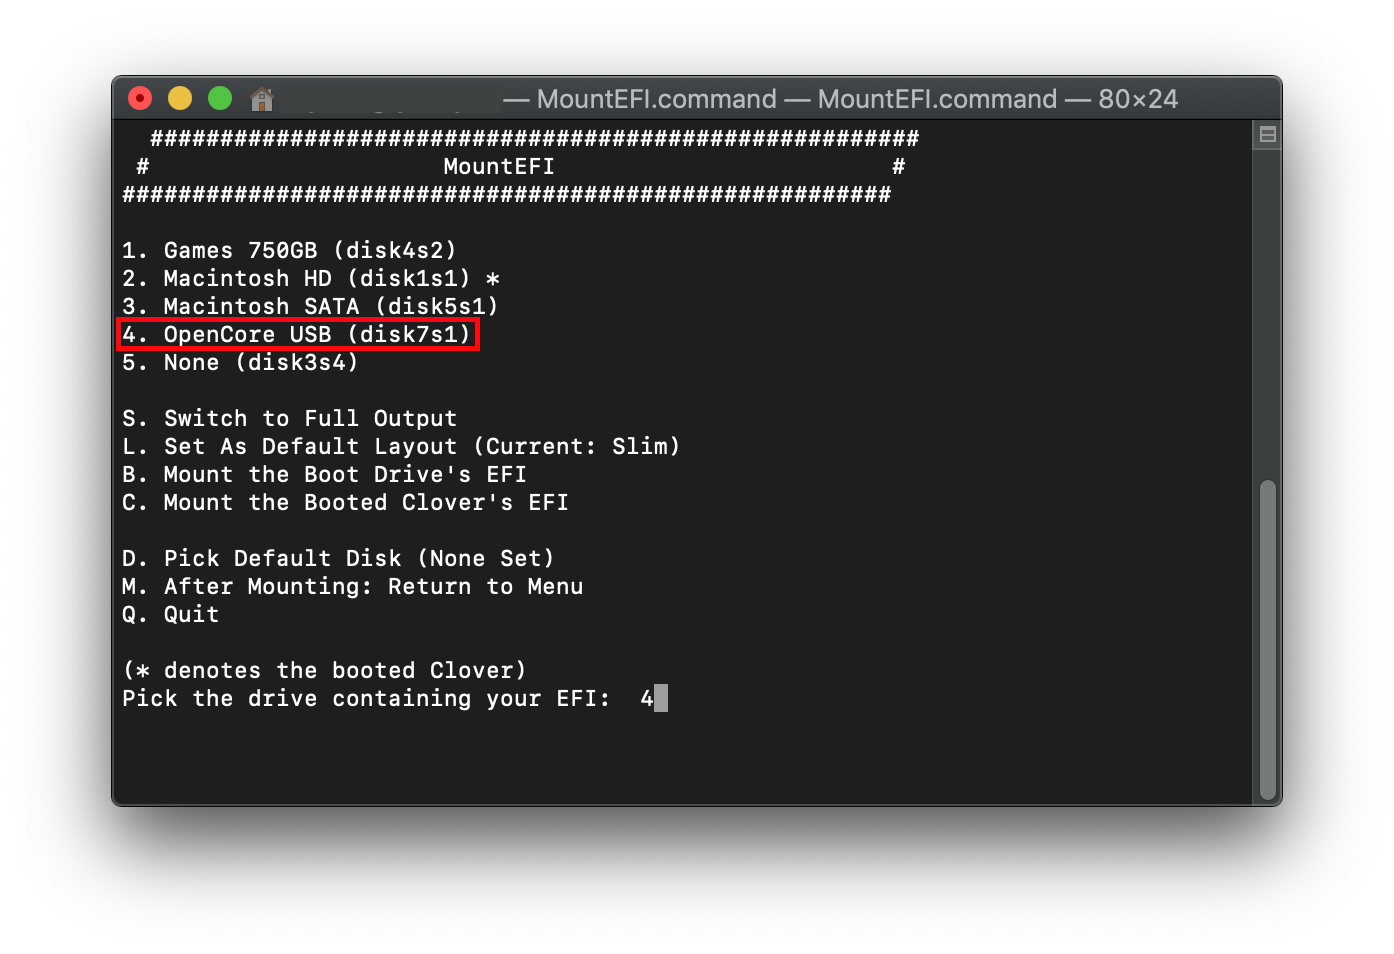
# Настройка EFI окружения OpenCore
# Создание установщика в Windows
В то время как вам не нужна чистая установка macOS чтобы использовать OpenCore, некоторые пользователи предпочитают иметь свежую версию ОС с обновлением их Boot Manager.
Чтобы начать, вам нужно:
USB флешка объемом 4 Гб
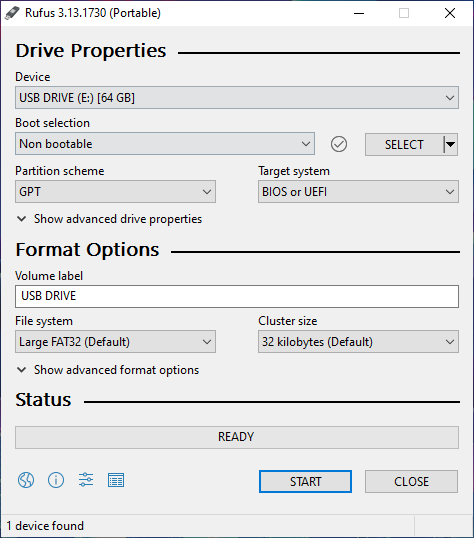
Для USB-накопителей объемом свыше 16 Гб для форматирования в FAT32 используйте Rufus
# Скачивание macOS
Получение устаревших установщиков очень простое, для начала получите копию OpenCorePkg
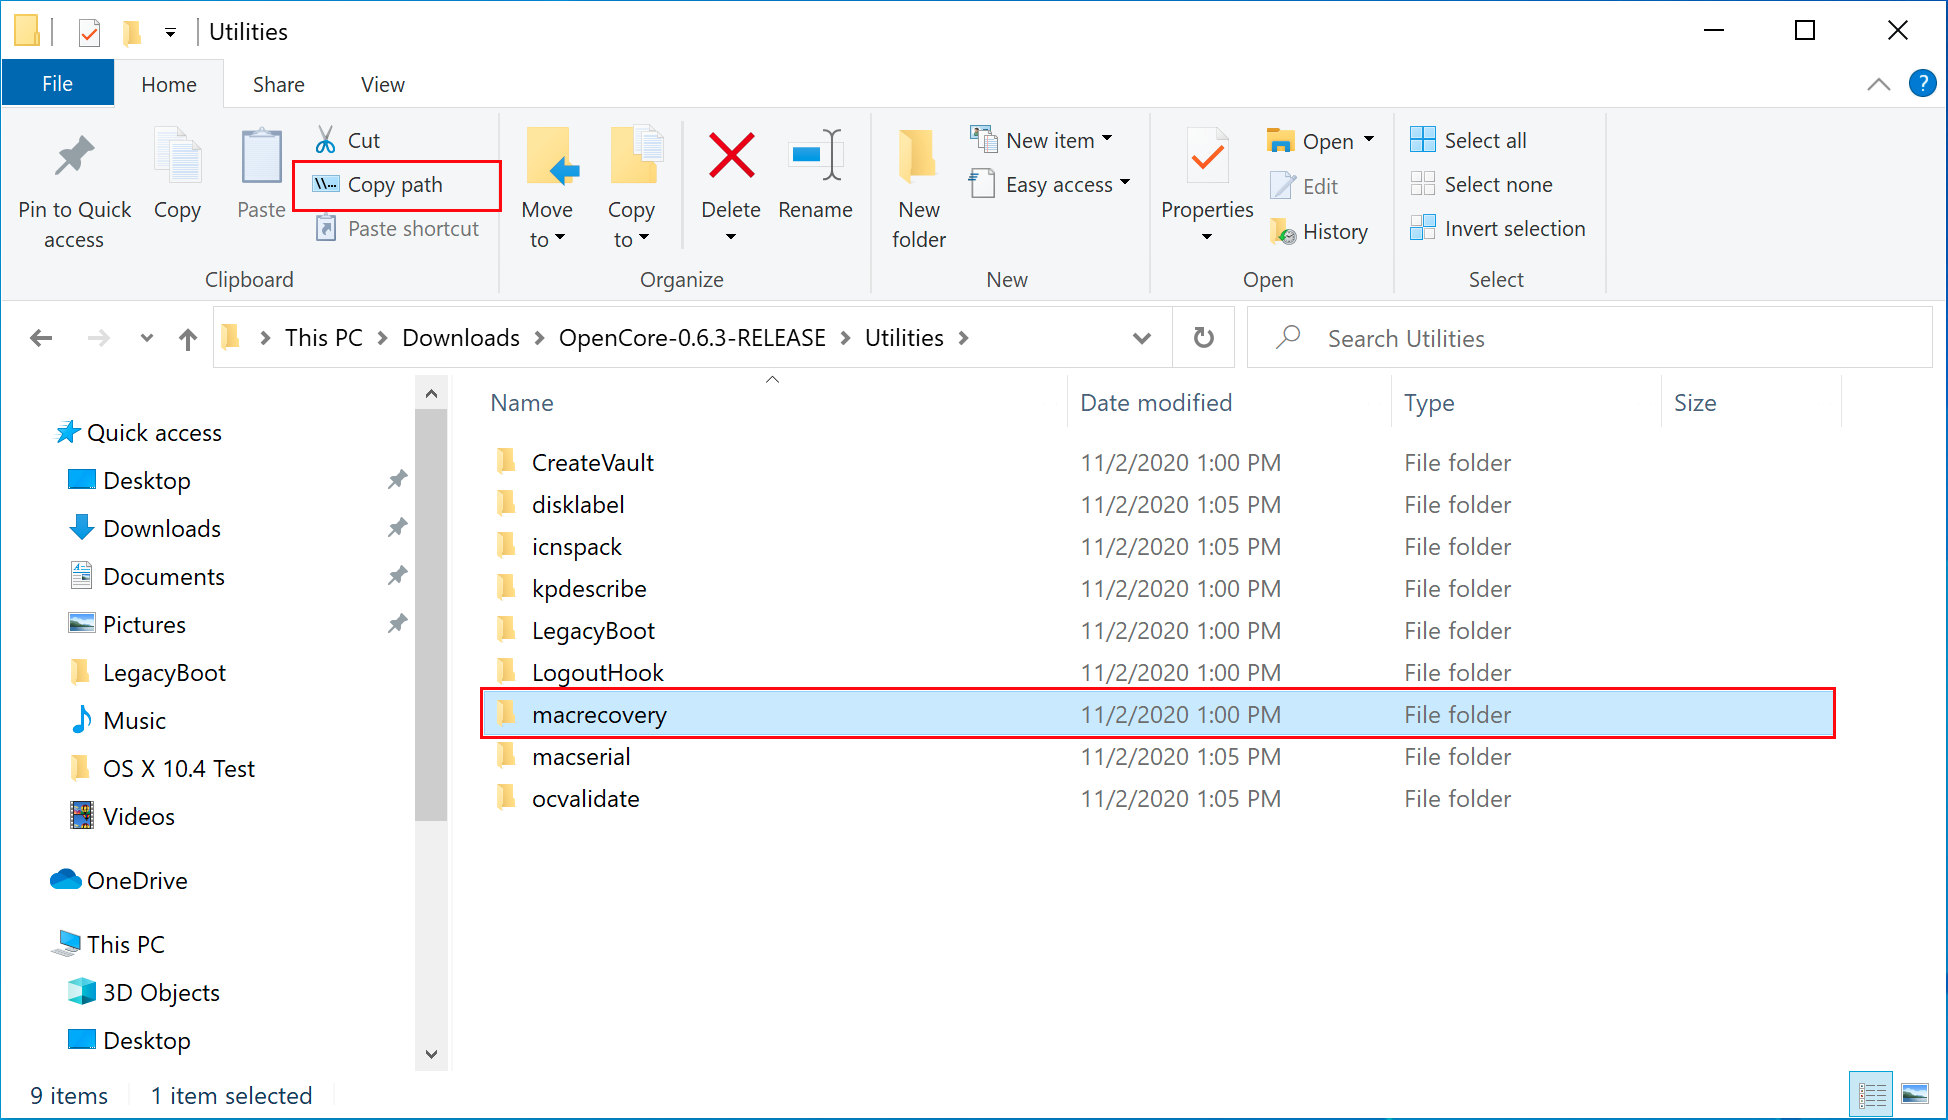
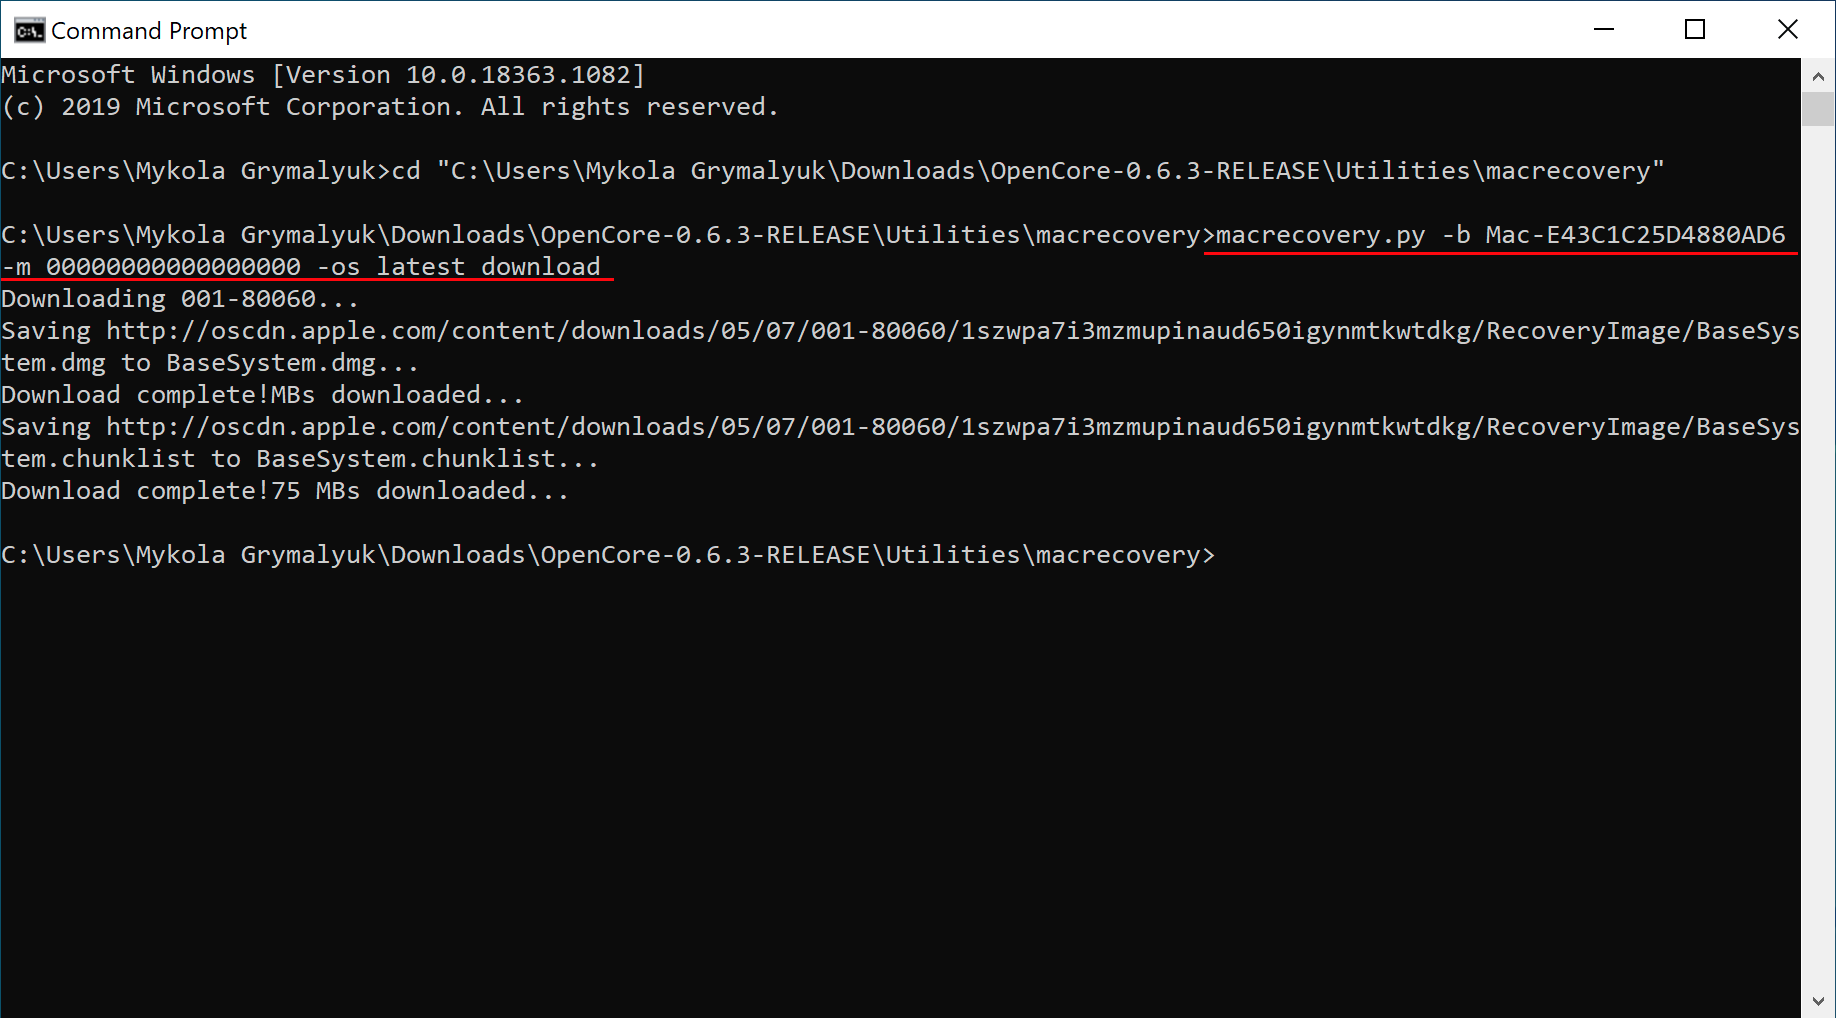
Отсюда, вы захотите открыть Командную Строку и «cd» в папку macrecovery, путь которой мы скопировали ранее:
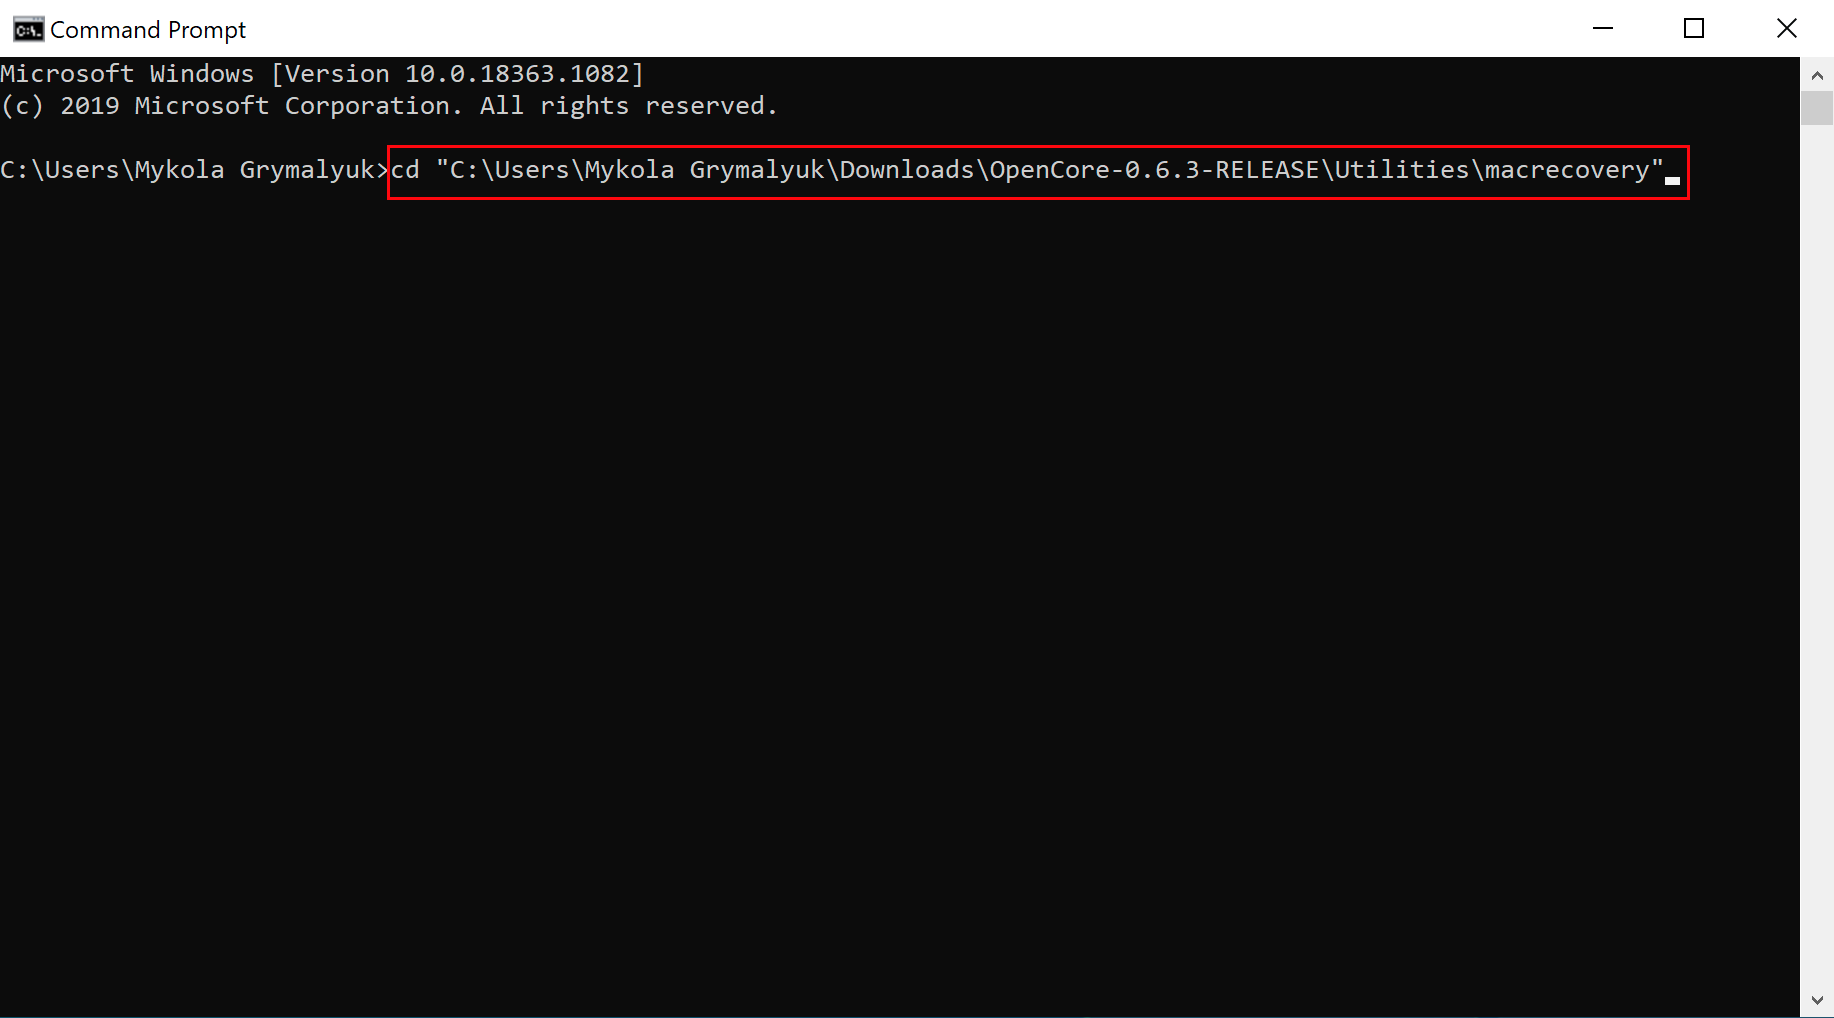
Теперь запустите одну из следующих команд, в зависимости от того, какую версию macOS вы хотите (Обратите внимание на то, что эти скрипты написаны на Python
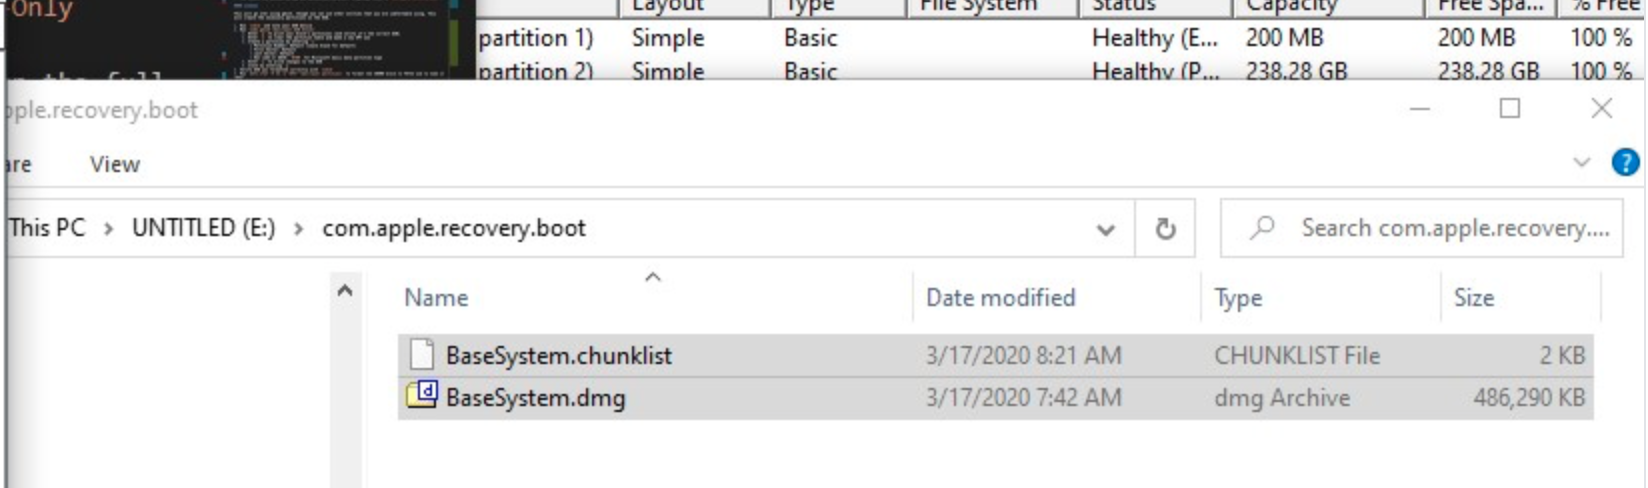
Это займёт некоторое время, однако когда вы закончите, вы должны получить BaseSystem или RecoveryImage файлы:
| BaseSystem | RecoveryImage |
|---|---|
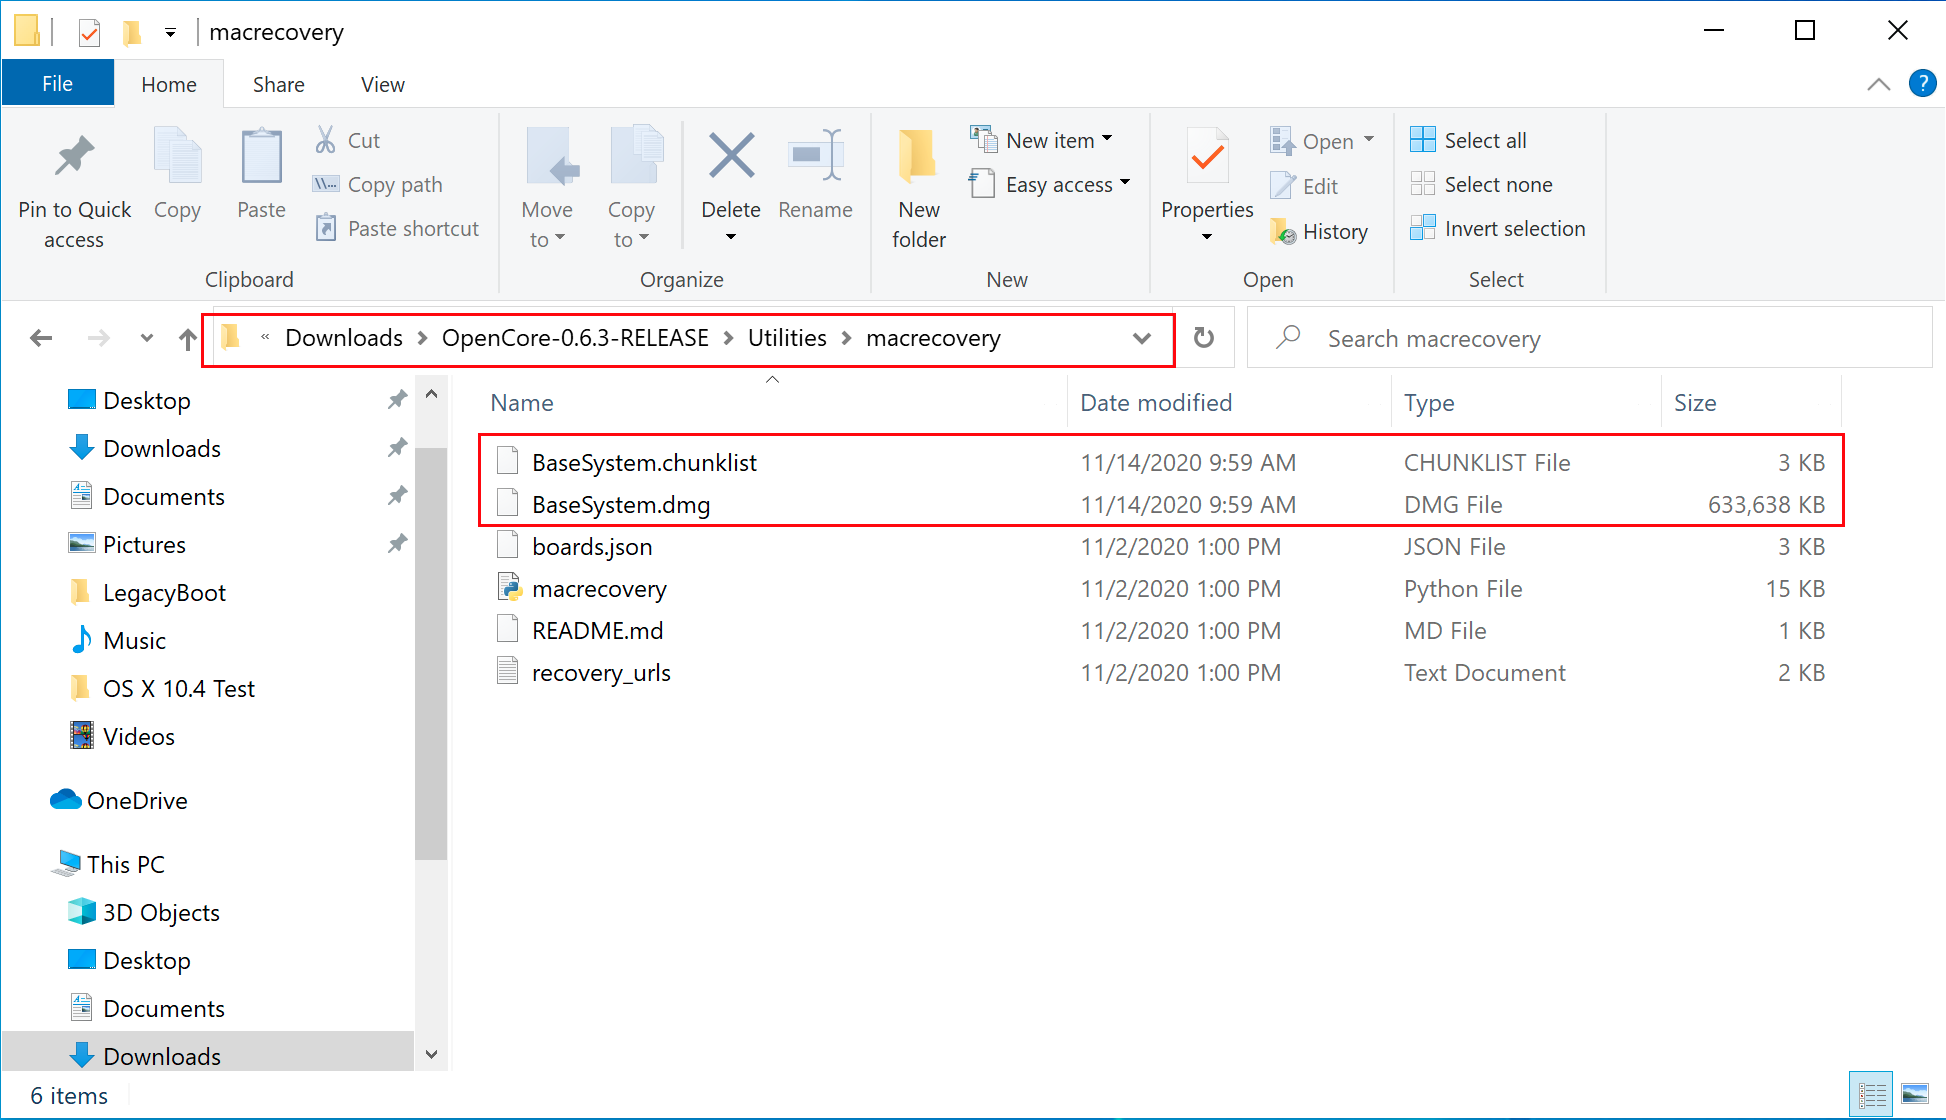 | 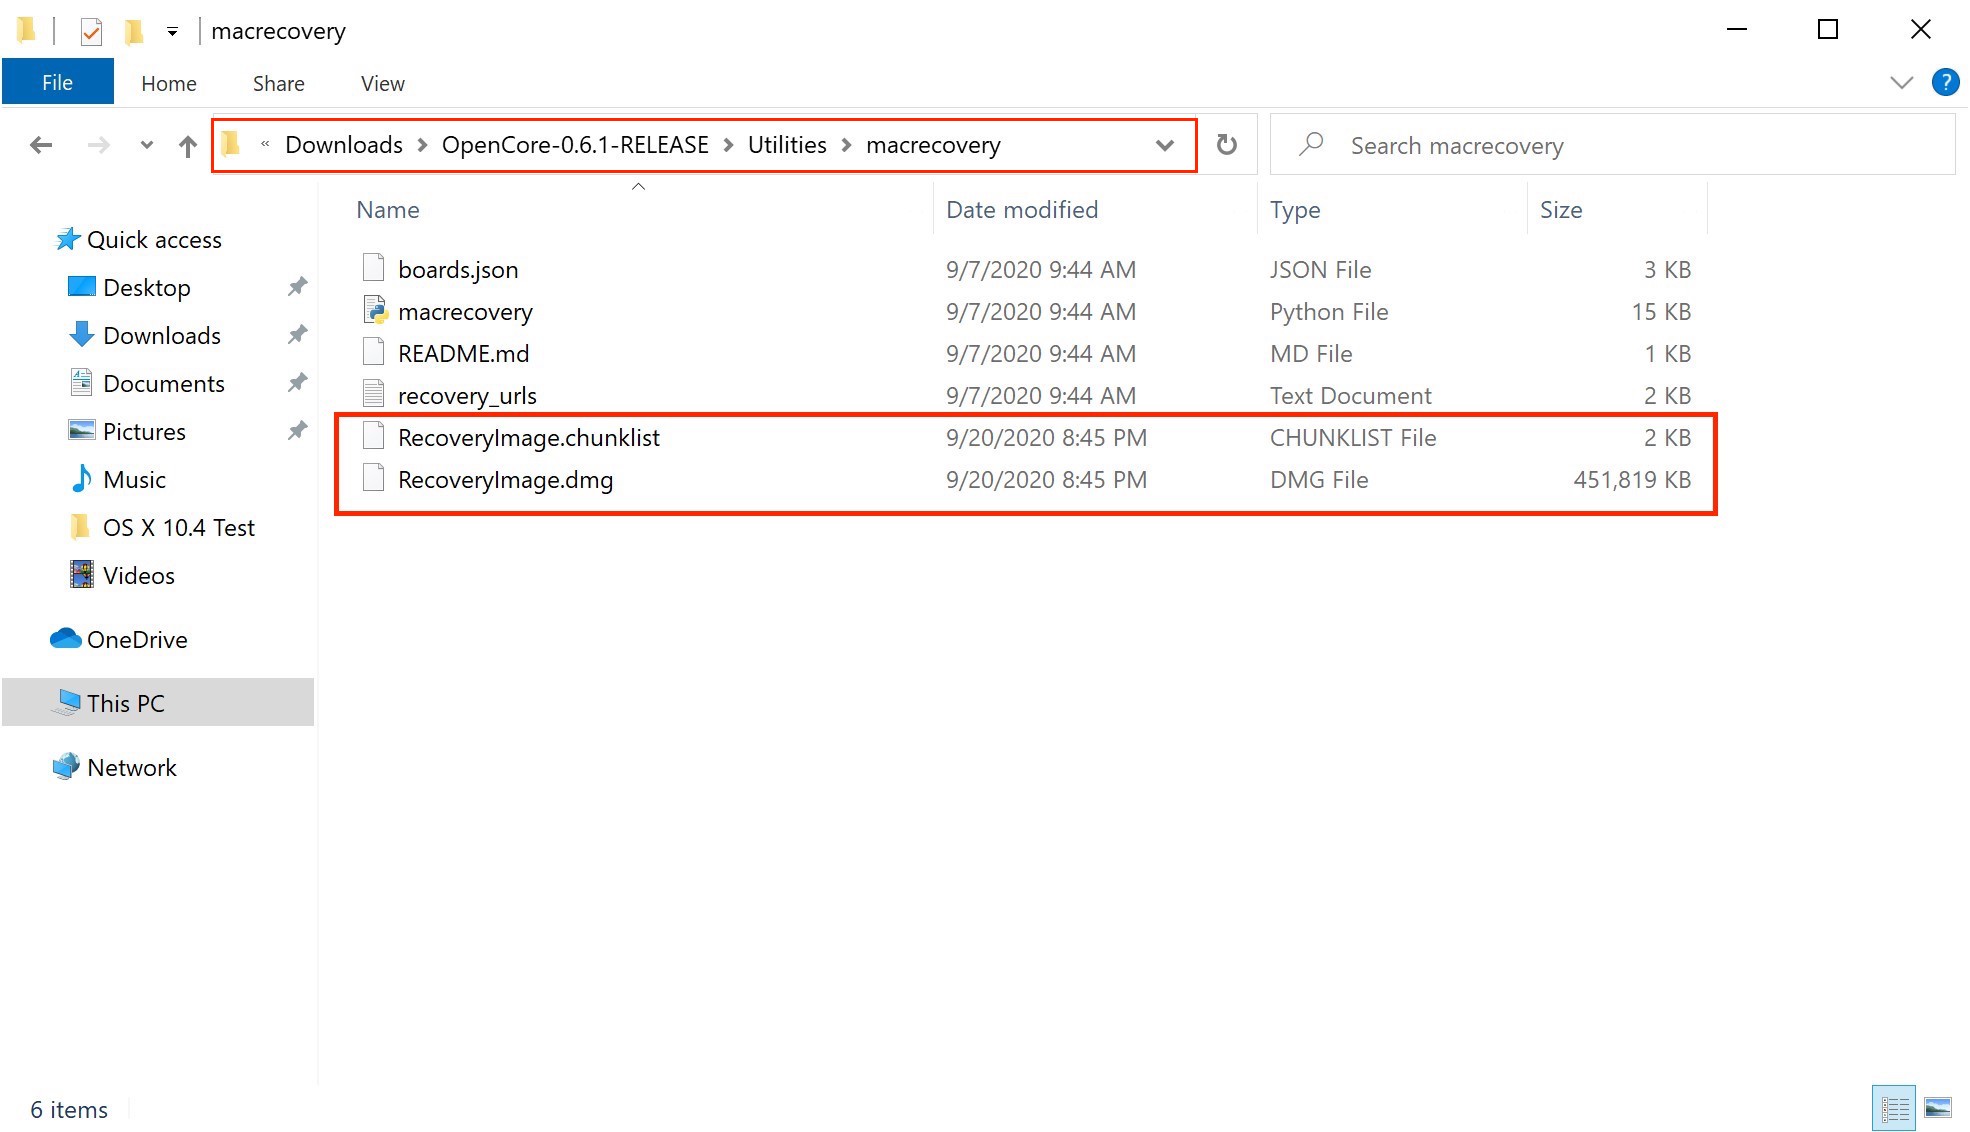 |
Теперь, когда наш установщик загружен, мы дальше захотим отформатировать USB.
# Создание установщика
Здесь мы будем форматировать наш USB накопитель и записывать на него macOS. Для этого у нас есть несколько вариантов:
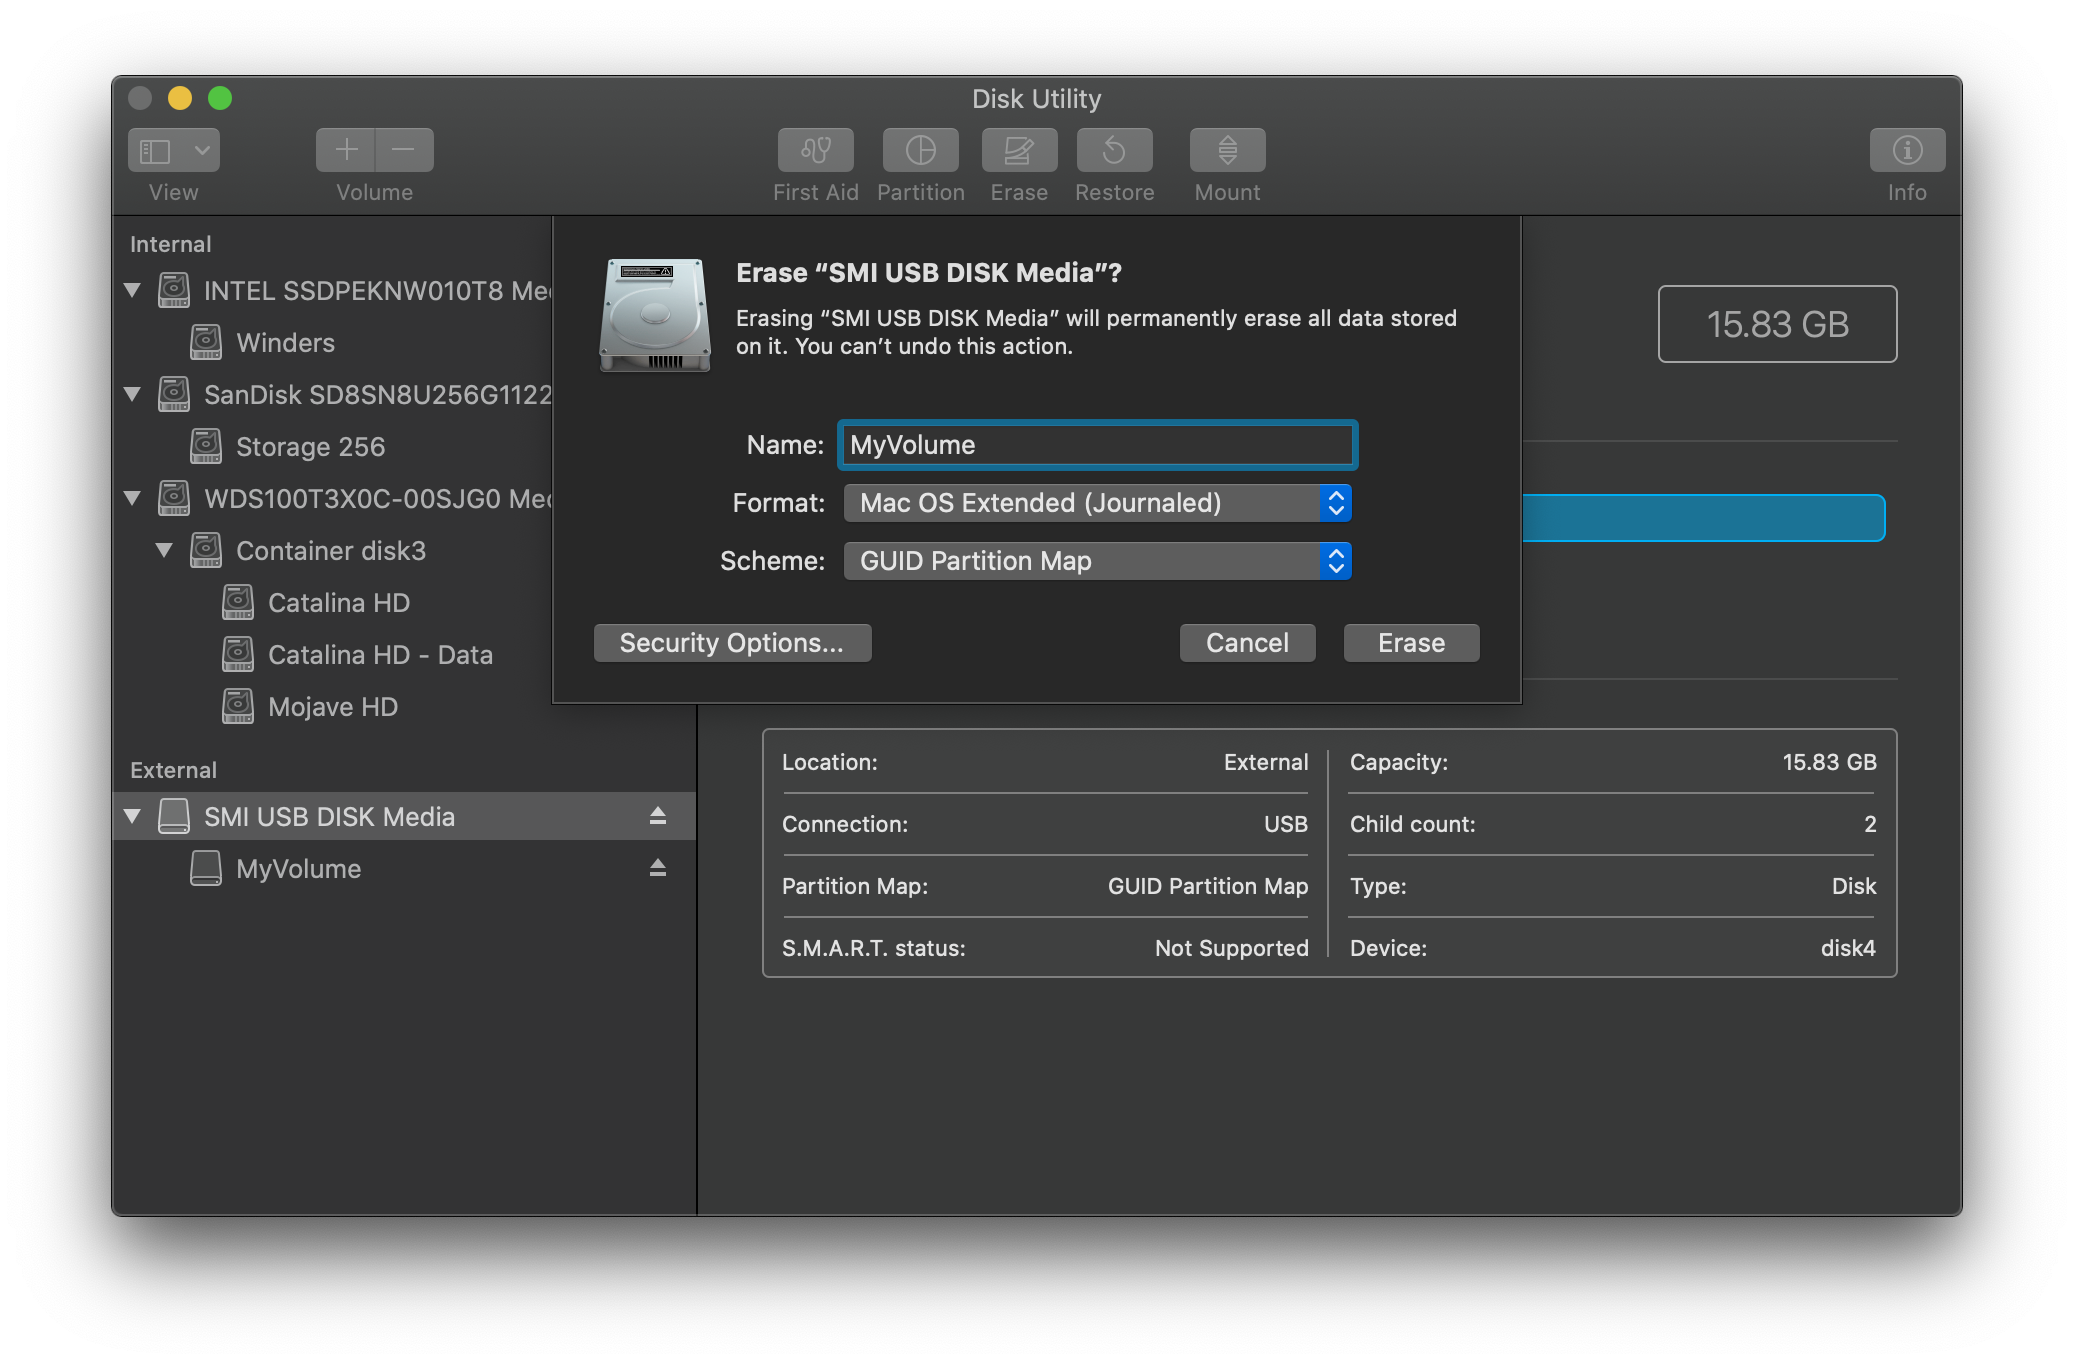
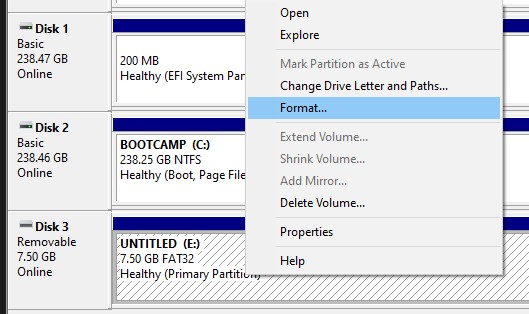
# Через Управление Дисками
Просто откройте Управление Дисками, и отформатируйте ваш USB накопитель в FAT32:
Теперь возьмите OpenCorePkg, который вы ранее загрузили и откройте его:
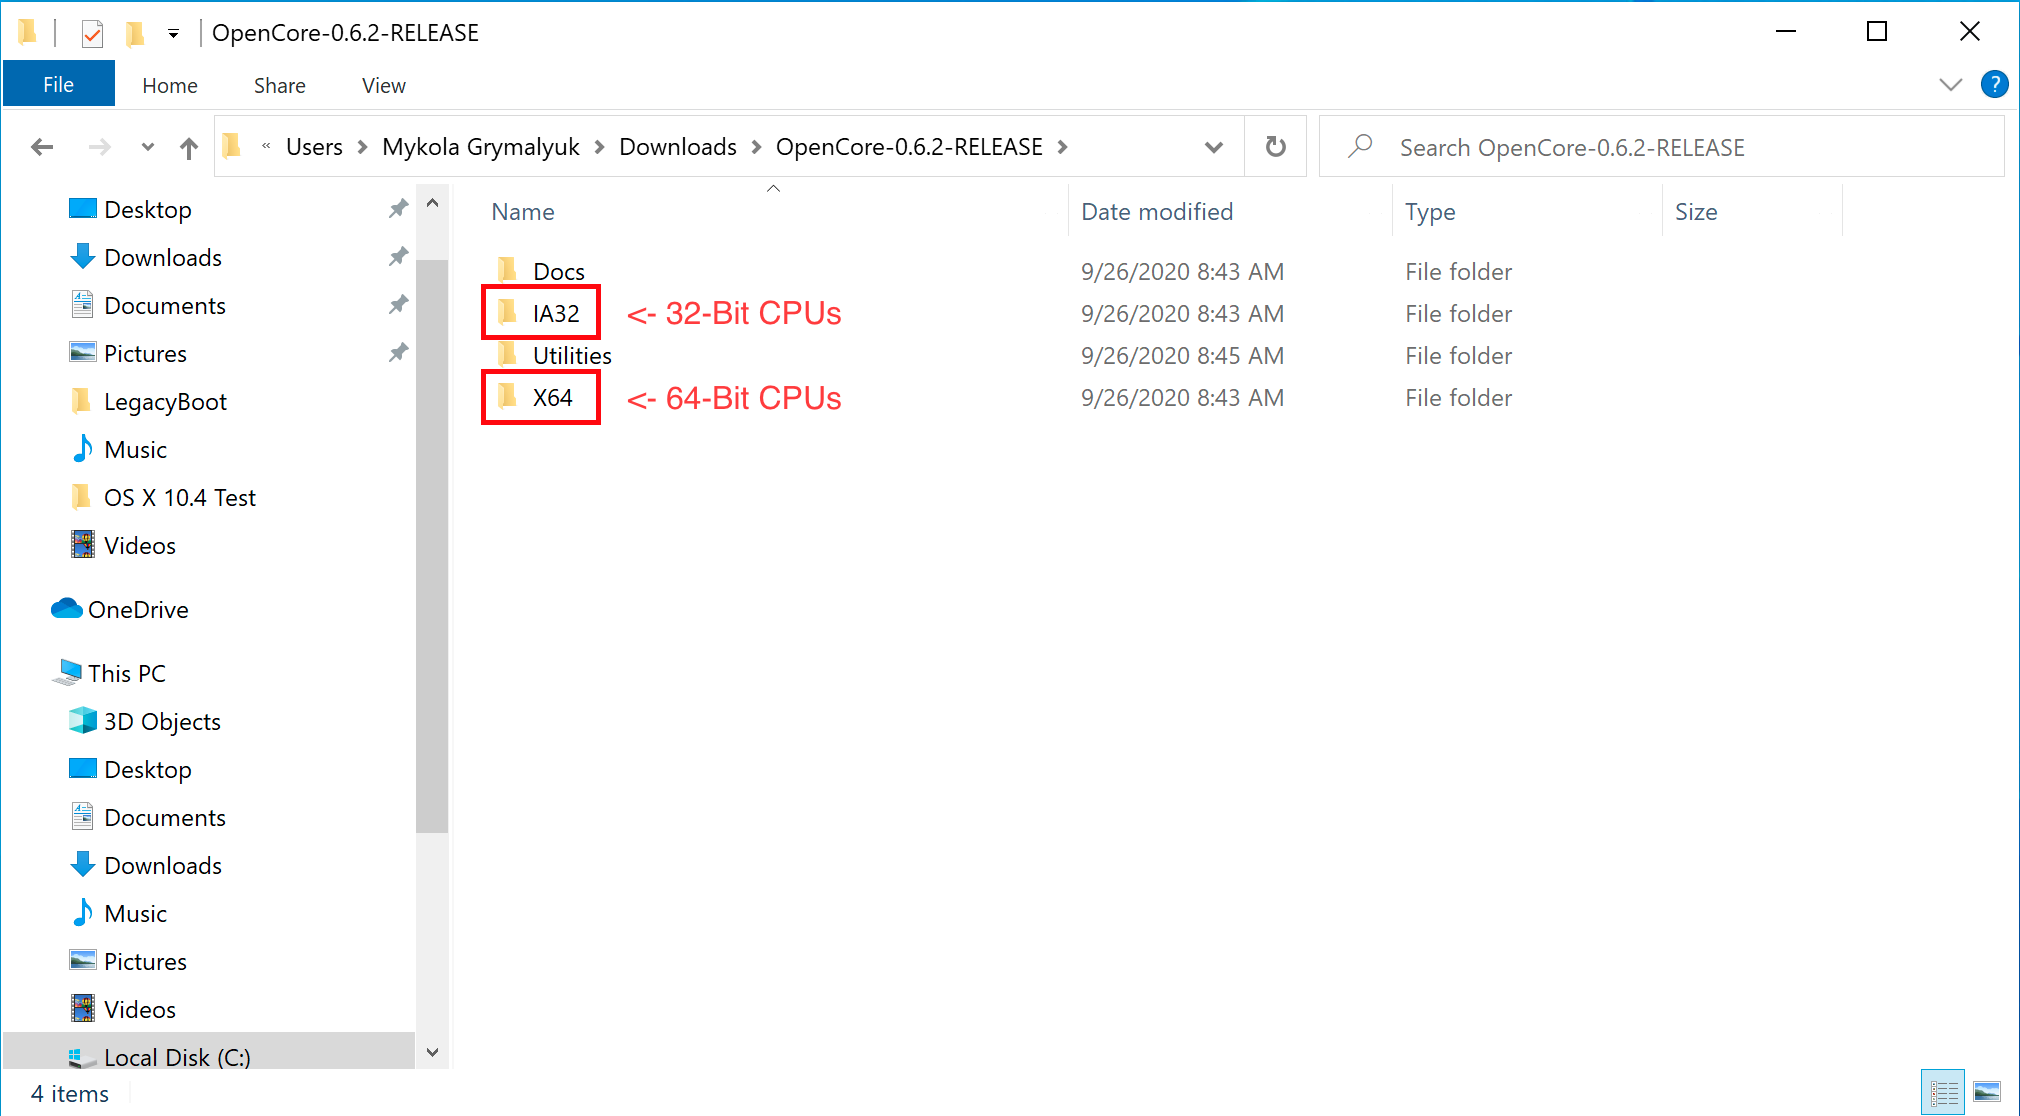
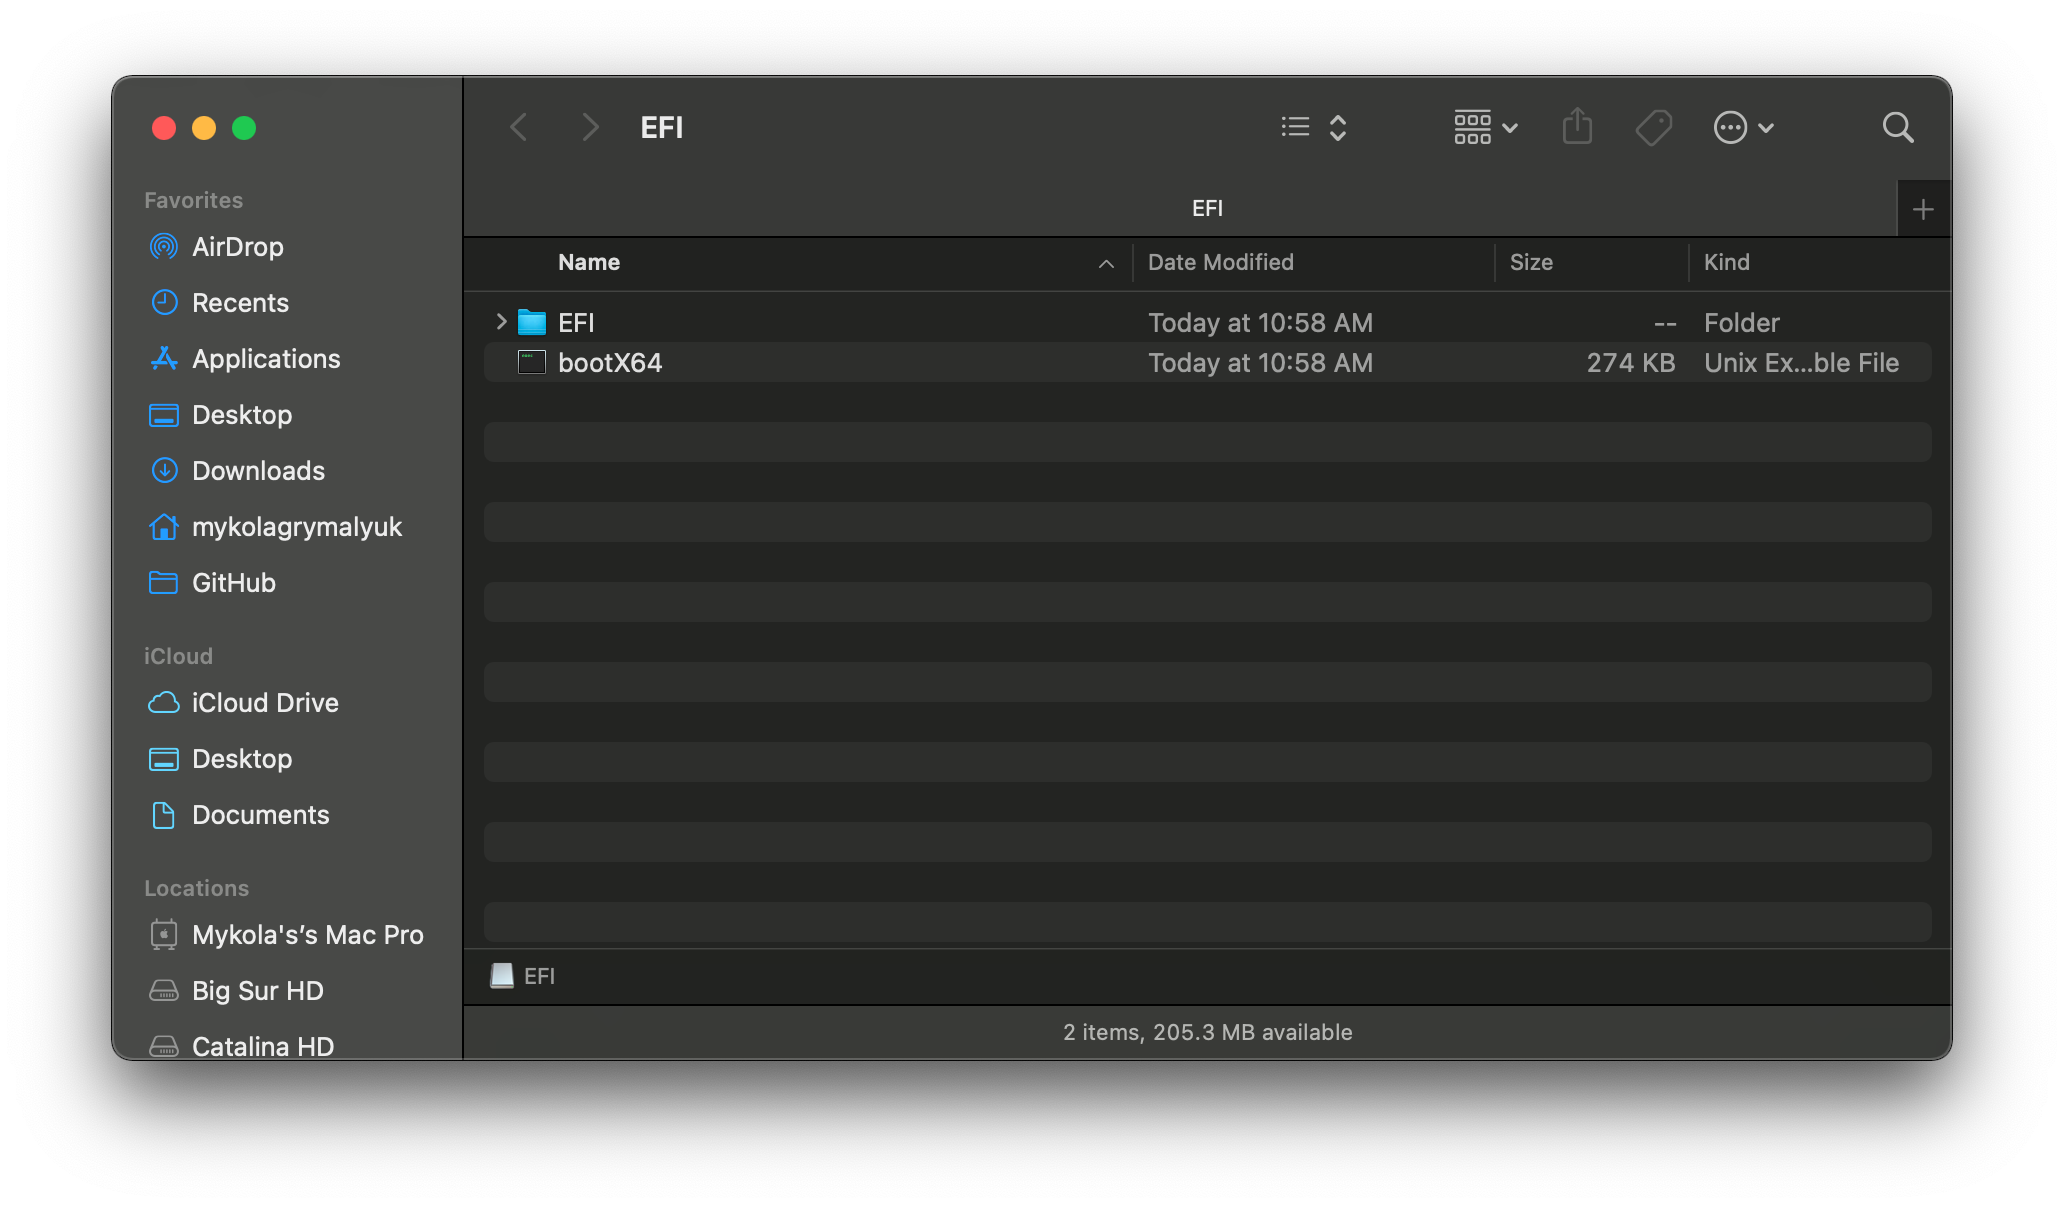
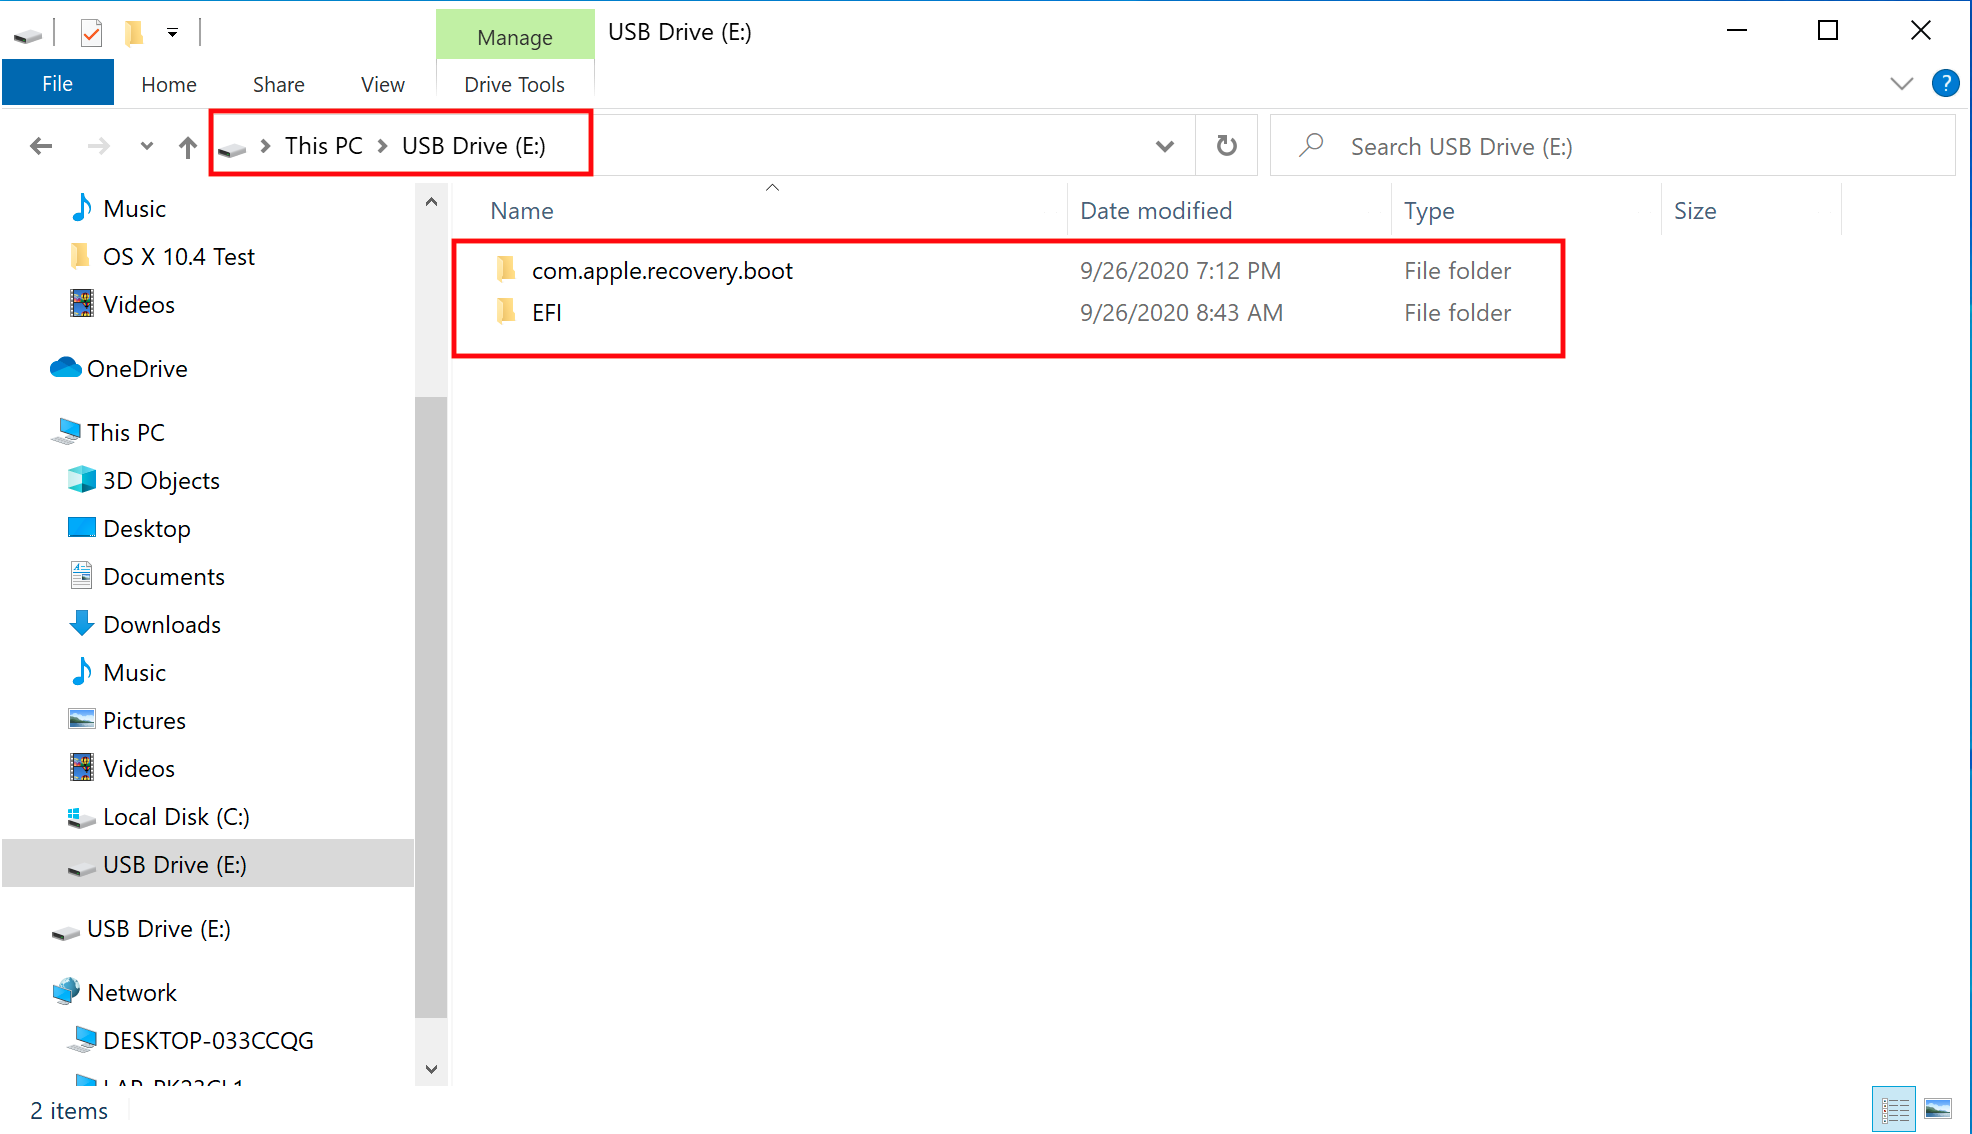
Здесь мы видим папки IA32 (32-битные процессоры) и X64 (64-битные процессоры), выберите подходящую для вашего оборудования, и откройте её. Затем возьмите папку EFI внутри и поместите в корень USB накопителя, рядом с com.apple.recovery.boot. После этого, оно должно выглядеть так:
# Через Rufus
Теперь возьмите OpenCorePkg, который вы ранее загрузили и откройте его:
Здесь мы видим папки IA32 (32-битные процессоры) и X64 (64-битные процессоры), выберите подходящую для вашего оборудования, и откройте её. Затем возьмите папку EFI внутри и поместите в корень USB накопителя, рядом с com.apple.recovery.boot. После этого, оно должно выглядеть так:
# Через diskpart
Теперь запустите следующее:
Теперь возьмите OpenCorePkg, который вы ранее загрузили и откройте его:
Здесь мы видим папки IA32 (32-битные процессоры) и X64 (64-битные процессоры), выберите подходящую для вашего оборудования, и откройте её. Затем возьмите папку EFI внутри и поместите в корень USB накопителя, рядом с com.apple.recovery.boot. После этого, оно должно выглядеть так:
Настройка установки в Legacy
Если ваше оборудование не поддерживает UEFI, смотрите инструкции ниже.
Для начала, вам понадобится следующее:
Далее, откройте BOOTICE и убедитесь, что вы выбрали правильный накопитель.
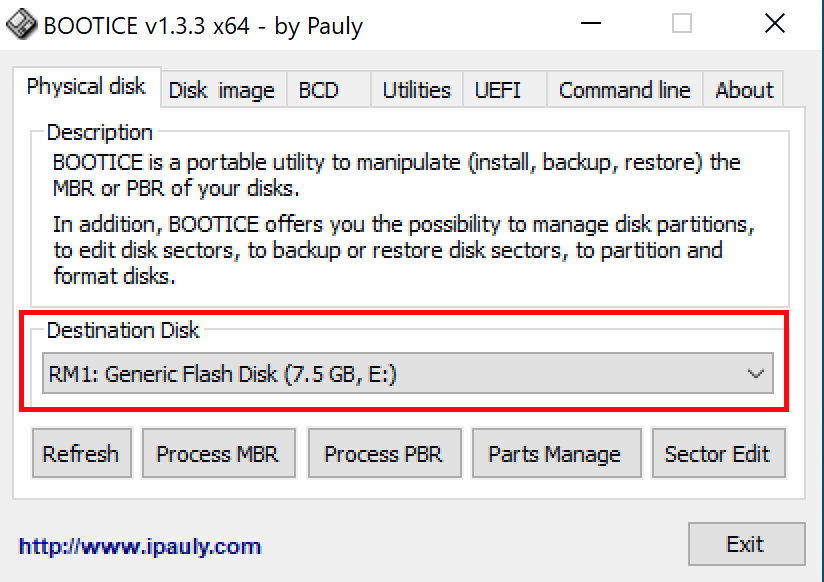
Затем, войдите в «Process MBR», потом нажмите на «Restore MBR» и выберите boot0 файл из Utilities/LegacyBoot/ в OpenCorePkg:
| Восстановление MBR | Восстановление boot0 файла |
|---|---|
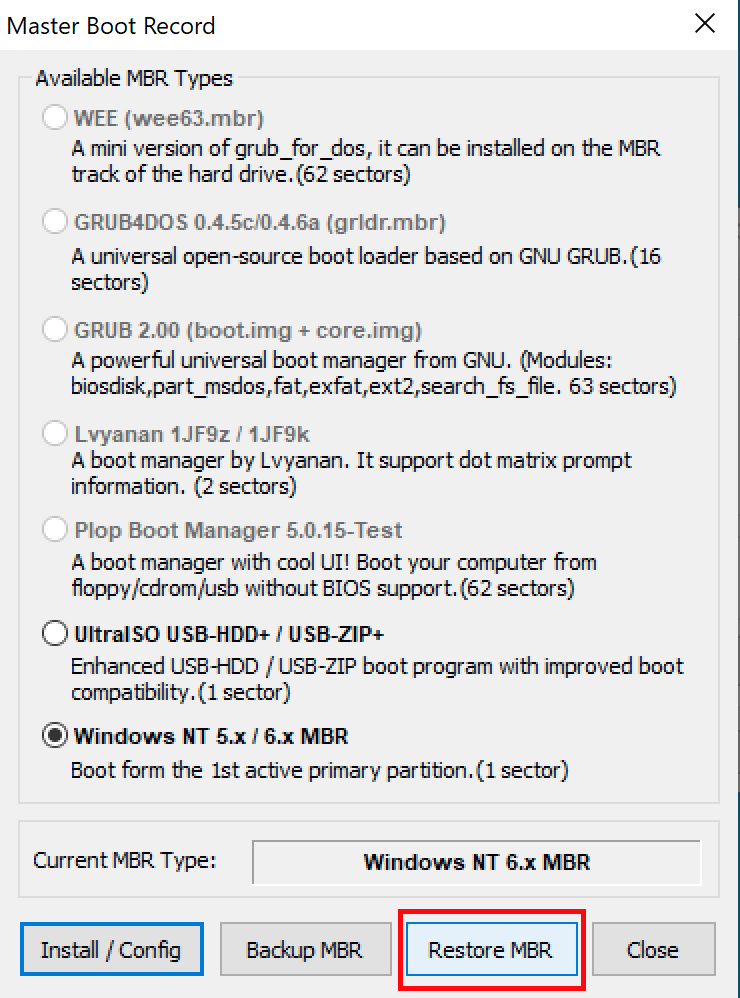 | 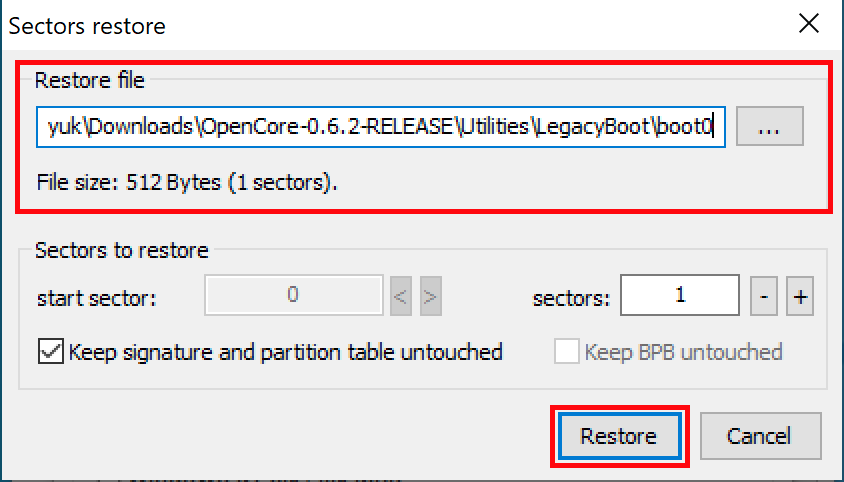 |
После, вернитесь на главный экран и выберите «Process PBR», затем «Restore PBR». Здесь, выберите Boot1f32 файл из Utilities/LegacyBoot/ в OpenCorePkg:
| Восстановление PBR | Восстановление boot1f32 файла |
|---|---|
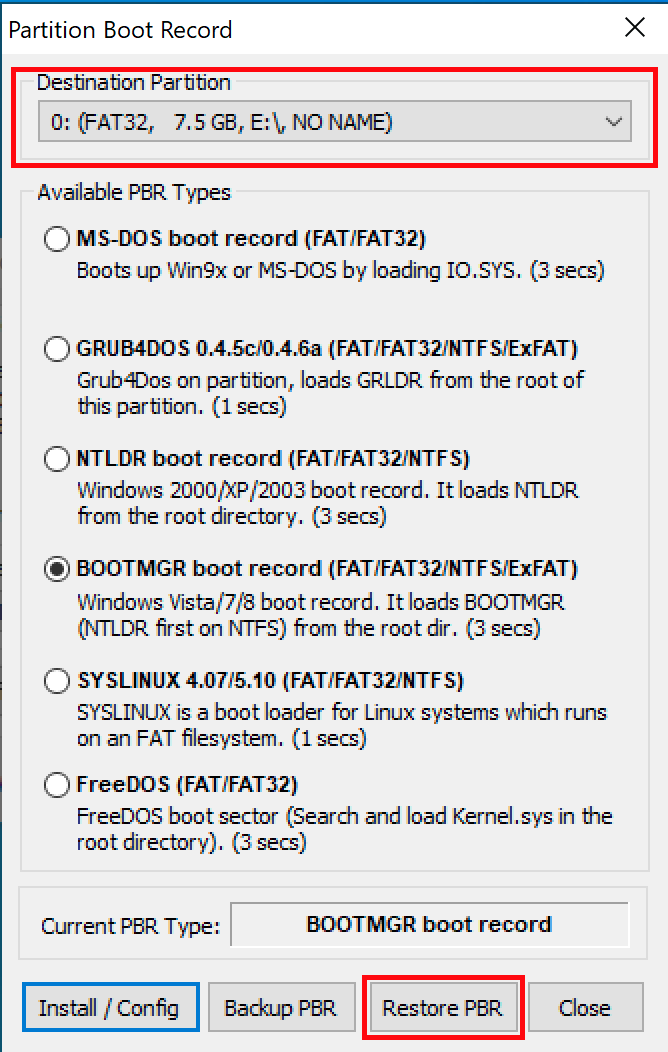 | 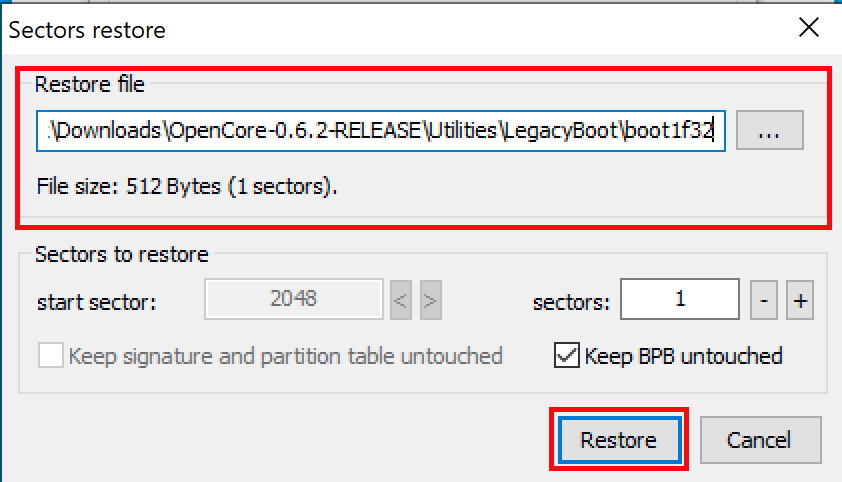 |